• About

sarathings

~ my art, my family, my life, my stuff…

sarathings

Tag Archives: Stampin’ Up

December Daily 2014 | Days 10 – 18

15 Thursday Jan 2015

Posted by Sara in December Daily, Mini Album, ScrapBook

≈ 1 Comment

Tags

Ali Edwards, December Daily, Freckled Fawn, Stampin' Up

Ready for some more eye candy?

day 10

Molly had her school Christmas concert on the 10th and I just love this picture of her and two of her friends – the word art is another digital oldie from Ali Edwards and I added some star sequins from my stash.

day 10a

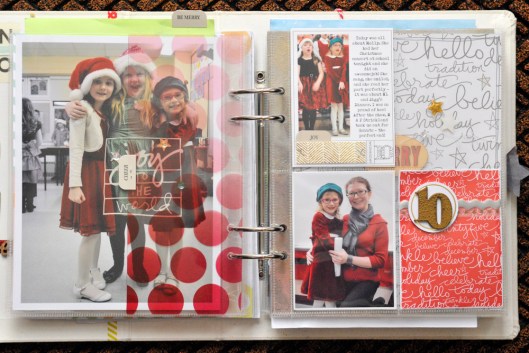
A picture of Molly singing at the concert and another with her beloved teacher (she was filling this fall for the regular teacher who was on maternity leave and she will be sorely missed!). I also added a Stampin’ Up! transparency and some Freckled Fawn stars to one pocket but forgot to take a close up – sorry!

day 11The night of the 11th was our last Keeping Track of Life class before Christmas and a couple of us decided to take advantage of the fact we were out anyway and go grab some food – love doing that after classes! The awesome script paper is from the DD kit while the wood veneer and red metallic alphas are from the SU! kit.

day 12
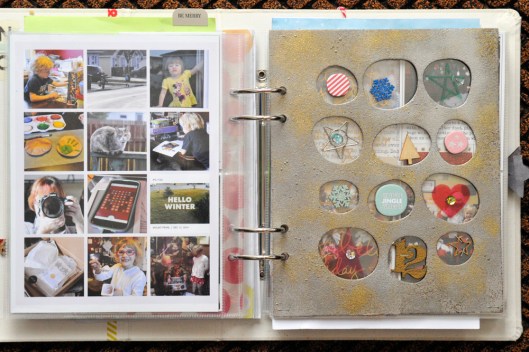
This is one of my favourite spreads in the album for two reasons: it’s got my 12 on Twelve pics, which I love each month, and it’s got that amazing chipboard page from the DD kit which I heat embossed using gold, silver, and gold glitter powders. It’s super awesome. I added a transparency which I stapled on and then I added bits and pieces to the holes.

day 12 holesThat’s the front and back. Isn’t it great?!? I really love how it turned out!

day 13
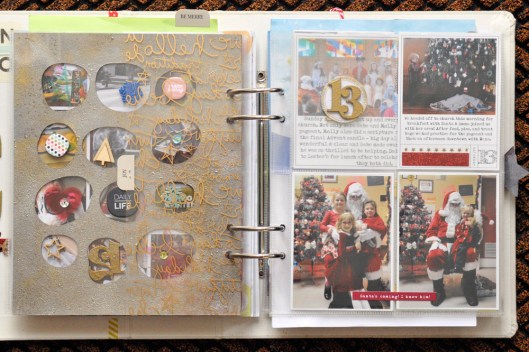
I used another 1/2 sheet of printed transparency as a divider between the chipboard and the photos for the 13th. The kids had breakfast with Santa at church and then their Christmas pageant rehearsal.

day 14
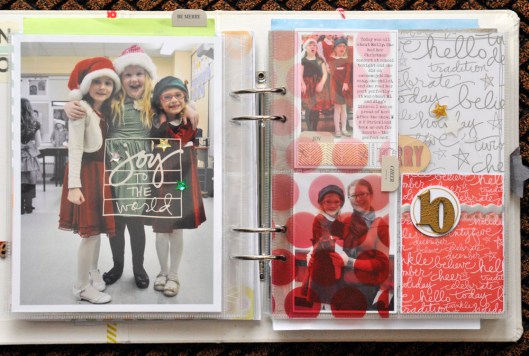
Christmas Pageant day! M&G were two of the three “wise people” plus Gabe lit the Advent Candle and Molly did a scripture reading. Then my Dad took us all out for lunch – big day all around! The “JOY” letters were simply stapled to a page protector that I cut up and slipped into the pocket.

day 15
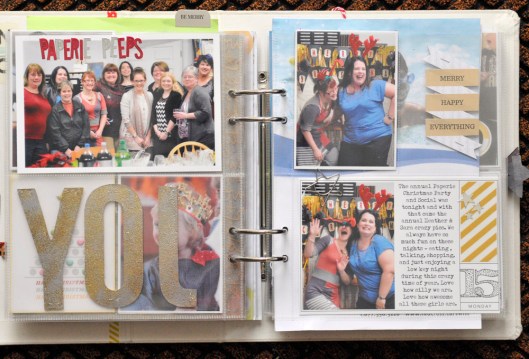
One the fun nights each year is The Paperie Members party.  There’s always a group shot plus Heather and I always manage to have crazy pictures together – I think we’re the wacky ones. 🙂

day 16

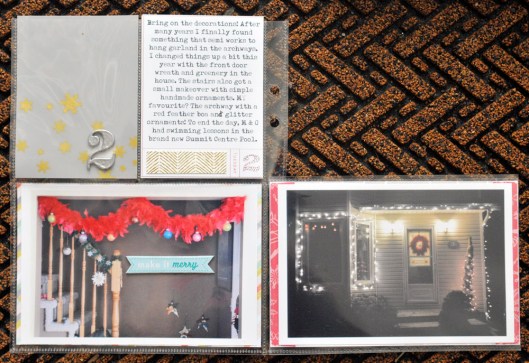
A couple of months ago our new fitness centre and pool opened – a *huge* upgrade from the place we were in and the kids are loving their lessons in this big bright place. Luckily, most of the instructors made the move over too so we still have the same awesome swim coaches for the kids.

day 16a

Today also had a fun little visit to Gabe’s classroom to see all the Christmas art projects he’s been working on and to hear the songs he and his classmates have learned. All those four- and five-year-olds singing and dancing? The best.

day 17
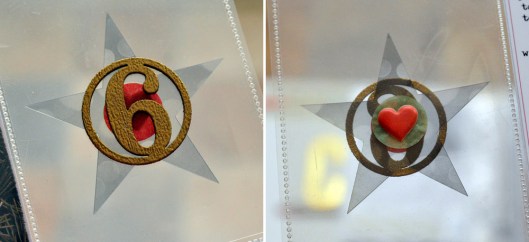
Day 17 is my other favourite spread. I convinced the kids (Molly required bribery) to let me get some pictures and I love how they turned out. I’ve already shared Molly’s and Gabe’s here on the blog but they needed to make it into my album too. I’m pretty sure you’ll also see them on a LO or two in the future! I kept things super simple with a large gold initial in one pocket and a puffy heart sticker in the centre of each page.

day 17aMolly had her last climbing night of the year and managed a 5.8 overhang, with a little help. I have no idea what any of that means since Darrell is the one who takes her wall climbing but they were both very happy with that news when they got home!

day 18

One of my favourite things to do each Christmas is to go see a local group, The Ennis Sisters, do their Christmas show. They travel right across the island part of the province, singing in churches, and they donate part of the proceeds of each show back to the communities they perform in. They’re amazing and I always feel like Christmas truly starts once I’ve gone to the concert. I added the playbill and ticket in one of the pockets.

Woah! Another long one but only one more post to go – tomorrow I’ll finish it off!

Cheers!

S.

Share this:

  • Click to share on Twitter (Opens in new window)
  • Click to share on Facebook (Opens in new window)
  • Click to email a link to a friend (Opens in new window)
  • Click to share on Pinterest (Opens in new window)
  • Click to share on LinkedIn (Opens in new window)
  • Click to print (Opens in new window)
  • Click to share on Tumblr (Opens in new window)
  • Click to share on Reddit (Opens in new window)
  • Click to share on Pocket (Opens in new window)

Like this:

Like Loading...

December Daily 2014 | Days 1 – 9

14 Wednesday Jan 2015

Posted by Sara in December Daily, Mini Album, ScrapBook

≈ 4 Comments

Tags

Ali Edwards, December Daily, Freckled Fawn, Stampin' Up

Ok people, grab your favourite cup of something and settle in! Even though I’m breaking this up into several posts there are still lots of pics. I’m give a quick rundown but if you have any questions just ask in the comments and I can answer in more detail. Enjoy!

The first spread in my book has pieces from the Freckled Fawn Christmas Embellishment kit and the Ali Edwards December Daily kit. Those two, along with a mini Project Life Christmas Kit from Stampin’ Up! made up my supplies for this year.

opening spread

I love the full-page papers from AE and thought this was the perfect way to start the season, with the addition of a little bling, of course!

day 1Another full-page paper with some embellishment additions and the sheet Molly had to fill out for school listing her Santa wishes.

day 1aAnd December 1st is not complete with Advent Calendars – Lego ones here, as always! I used an old Ali Edwards overlay in Photoshop for the picture.

day 2On the third I started decorating and Gabe brought home a colouring page from school. He loves to look through the mini albums and see his things so he asked almost every day to have his school work added in.

day 2 open

I wanted to show more of the decorations but not have them a focal point so I used a Simple Stories flip pocket to add in a couple more pictures.

day 3

Whenever I have two days on one spread I try to separate them with an acetate divider. I totally stole this idea from Ali Edwards – I loved how the transparency overlays looked when cut in half.

day 3aI added Gabe’s end-of-session report from Gymnastics and I still have to include the reindeer the kids are making in the picture. The washi tape is from the Freckled Fawn kit and I gold embossed the circle of stars and the “3”. Almost all the wood veneer numbers are gold, with a few silver thrown in for some change!

day 4A bunch of odds and ends for Day 4 – Stampin’ Up! wood veneer embossed with gold and silver, a glitter tree stickers, lots of diagonal stamping and a small pocket from last year’s DD kit to hold a lunchbox note I gave Molly. It cam back with a heart and a note on it for me. 🙂

day 5

Day 5 was all about the Santa picture. I think I’ve figured out the timing to get at Santa without the huge lineup – I’ve manged to beat it the last two years! This is my favourite Santa picture ever – I’m sure the photographer thought I was nuts when I said I didn’t want the kids looking at us but it turned out perfectly!

day 6This year, my sisters- and mother-in-law decided to have a girls only Christmas shopping trip. I decided we were doing a Santa picture and yes, I totally bullied them all into it. Isn’t that a great keepsake though? All the girls on my husband’s side of the family – that doesn’t happen very often!

We also went to the Bowring Park Annual Tree Lighting Ceremony and naturally Molly and Poppy would only pose together if they were crazy pictures. Someday I will have a nice one of those two together!

day 6 star

The see-through element here is made up of the bokeh star, a piece of tissue confetti, and a number from Freckled Fawn. I added more confetti and a puffy heart sticker to the back. Those puffy stickers in the DD kit? Maybe my favourite embellishment this year!

day 7-8

Another double day spread for 7 and 8. I taught a kid’s class at The Paperie on Sunday and we put up the tree (minus decorations) on Monday. I had originally stamped that card with numbers 1-8 but ended up attaching the big gold 8 instead and just stamping some sentiments.

day 9 I had a chance for some fun with Lori on the ninth and it took us forever to get a decent picture of the two of us – I’m not sure we ever succeeded! I pulled an Ali Edwards and journaled some notes to M&G with different size pens on the large paper page – I love how it looks! To highlight the “9” I coloured it with my red Wink Of Stella pen and doodled with Sakura’s Clear Stardust Gelly Roller.

Whew! Are you tired of pictures yet? I  hope not! Tomorrow I’ll have some more of the album, including my two favourite spreads of the year!

Cheers!

S.

Share this:

  • Click to share on Twitter (Opens in new window)
  • Click to share on Facebook (Opens in new window)
  • Click to email a link to a friend (Opens in new window)
  • Click to share on Pinterest (Opens in new window)
  • Click to share on LinkedIn (Opens in new window)
  • Click to print (Opens in new window)
  • Click to share on Tumblr (Opens in new window)
  • Click to share on Reddit (Opens in new window)
  • Click to share on Pocket (Opens in new window)

Like this:

Like Loading...

Party Cards!

14 Friday Dec 2012

Posted by Sara in Cards

≈ 8 Comments

Tags

cards, Christmas card, October Afternoon, Stampin' Up

I went to a great party last night with an awesome group of friends and laughed until I hurt. We crafty types, we know how to have a good time!

This was the party I mentioned a couple of days ago that I made cards for. Almost half the cards I made in total this year actually!

Again, I went super simple (and check out the cute photo bomber):

brown paper packages card

Kraft paper, naturally, with snowflakes stamped in Colorbox Pigment ink in Frost White (the best white ink) and then tied up with baker’s twine. A strip of October Afternoon washi, a mist of Blizzard Mr.Huey’s and done.

Inside I added a sentiment from the My Mind’s Eye Winter Wonderland stamp set and more mist, plus the twine gave me the perfect spot to stick the family photo:

brown paper packages card - inside

And the shimmer from the Blizzard is awe-some! Love the iridescence of it!

brown paper packages card - inside shimmer

Unfortunately, I thought of misting after writing names on all the washi in non-permanent ink and so some of them were blurred and smudgy. Going with my “taking Christmas off” vibe this year, I shrugged and said, “Meh.”

And I didn’t feel guilty at all. 🙂

S.

Remember, you have until Sunday night to comment on this post and maybe win a spot in the Home Blessings Big Picture Classes workshop with Courtney Walsh! Don’t miss out!

Share this:

  • Click to share on Twitter (Opens in new window)
  • Click to share on Facebook (Opens in new window)
  • Click to email a link to a friend (Opens in new window)
  • Click to share on Pinterest (Opens in new window)
  • Click to share on LinkedIn (Opens in new window)
  • Click to print (Opens in new window)
  • Click to share on Tumblr (Opens in new window)
  • Click to share on Reddit (Opens in new window)
  • Click to share on Pocket (Opens in new window)

Like this:

Like Loading...

Index Card A Day – #15

16 Saturday Jun 2012

Posted by Sara in ICAD2

≈ 6 Comments

Tags

Ali Edwards, ICAD, ICAD2, Kiddies, Stampin' Up, Technique Tuesday, The Crafter's Workshop

Two cards again today – you are lucky people!

I used one of the prompts today, sort of! There was one that said to use coloured pencils on black gesso or paint. I’ve been meaning to break out my new colourful embossing powders form Stampin’ Up and use them on a dark background, and I’ve been meaning to try out a technique with stencils that Ali Edwards uses sometimes. This was day!

I painted my index card with black watercolour paints – it would have been acrylic but I don’t own black acrylic! Then I paid down my 12×12 Punchinella stencil and pressed my Versamark pad over it. Once I removed the stencil, I sprinkled three different coloured embossing powders over it, and finished off the few open spots with silver. I love how it turned out, though in the future, I would use a lot less and be more careful of the silver since it went everywhere! The card has a lot more shine than I anticipated!

My only problem now was how to add my sentiment… More embossing, I guess! And then, since I was on an embossing roll, I embossed my wood veneer bird, I didn’t want it to feel left out, after all!

See all that shine? In certain lights all you can see is silver!

M decided to use the same technique as she watched the whole process with very big eyes! She chose the stars from Punchinella and wanted all silver, I guess she likes shimmer as much as her Mama does! I held the stencil while she stamped the Versamark, then she sprinkled on the silver powder. After that there was a litle fight about who would heat up the powder.

I won. 🙂 But she watched very closely.

So this is the front:

And then she saw a brown napkin we had used yesterday to blot the water out of her paints and she wanted to add that too. Once it was on and dry, she didn’t want to add anything else over that either! So here’s the back:

I love it, though it did take me an hour or more to convince her to let me photograph it. She decided that she didn’t like people looking at her things, hahaha! As you can tell, she caved eventually – I think hearing from Nana that she loves to look at M’s cards on the computer did it!

See you tomorrow!

S.

Share this:

  • Click to share on Twitter (Opens in new window)
  • Click to share on Facebook (Opens in new window)
  • Click to email a link to a friend (Opens in new window)
  • Click to share on Pinterest (Opens in new window)
  • Click to share on LinkedIn (Opens in new window)
  • Click to print (Opens in new window)
  • Click to share on Tumblr (Opens in new window)
  • Click to share on Reddit (Opens in new window)
  • Click to share on Pocket (Opens in new window)

Like this:

Like Loading...

We interrupt our regularly scheduled programming…

14 Tuesday Feb 2012

Posted by Sara in Baking, Family, ScrapBook

≈ 2 Comments

Tags

Baking, Basic Grey, Family, Hero Arts, Pioneer Woman, Sakura, Stampin' Up, Stamps, Valentine's Day

…for Valentine’s Day!

I was going to do another technique today, but just couldn’t pass up the Valentine’s thing. If you’re craving technique, check my previous posts here, here, and here – that should keep you going until tomorrow! 🙂

So, I knew Valentine’s was coming. I bought little treats for the kiddies, poked them away….. and promptly forgot about the whole thing!

Don’t get me wrong, I like Valentine’s Day. I just don’t get all hyped up about it. The point is, late last night I was up making M and G’s Valentine’s. And D’s is the technique for this week!

Valentine's

Also, since I forgot all about today, I didn’t get my kiddies on the ball making Valentine’s for their little friends or make the cupcakes for the party we always have. That meant Valentine’s making instead of cereal for breakfast and cupcake making with a crew of  (not very helpful) helpers this morning!

Valentine Cupcakes

Long story short, we got it all done, including making these cards, ate copious amounts of sugar, and, due to changing the topic at the last minute, this post is very, very late – sorry!

Hope you all have a very Happy Valentine’s Day with whomever or whatever you love – friends, family, pets, books…

Sara

P.S. The Valentine’s were made with this Hero Arts Stamp, Basic Grey Sugar Rush papers, Stampin’ Up! gems, and Sakura Gelly Rollers (I use medium for colouring) and Stardust Pens.

The cupcakes are this recipe (but made with rice flour and xanthan gum) and the frosting is this recipe (again with the rice flour!). These really are the best – even gluten free – with wheat, they’re to die for!

Share this:

  • Click to share on Twitter (Opens in new window)
  • Click to share on Facebook (Opens in new window)
  • Click to email a link to a friend (Opens in new window)
  • Click to share on Pinterest (Opens in new window)
  • Click to share on LinkedIn (Opens in new window)
  • Click to print (Opens in new window)
  • Click to share on Tumblr (Opens in new window)
  • Click to share on Reddit (Opens in new window)
  • Click to share on Pocket (Opens in new window)

Like this:

Like Loading...

Tuesday Techniques – Faux Metal

07 Tuesday Feb 2012

Posted by Sara in ScrapBook, Techniques, Tuesday Techniques

≈ 6 Comments

Tags

Authentique, Distress Stain, Embossing Powder, heat embossing, Perfect Pearls, Ranger, Scrap Space, Stampin' Up, Stamps, Studio Calico, techniques, VersaMark

Super fun technique today – faux metal! All you need is silver (or gold) embossing powder, VersaMark, and a heat gun! It doesn’t get easier than this, people, and it’s cool – bonus! And I apologize for the pictures – I did this in the night time and the lighting in my kitchen is terrible for pictures!

The Supplies

Pretty simple – you need VersaMark (or some other sticky embossing ink), a Heat Tool, silver embossing powder, and stamps.

First, press VersaMark onto some cardstock, then cover with silver embossing powder.

Silver Embossing Powder

Next, heat it up! There are a couple of ways to do the next few steps, but this is my way. After the first layer, let the powder cool for a moment, ink the embossed surface with VersaMark again, add more powder, and heat. For the next layer, as soon as the powder melts and the surface is still hot, pour embossing powder over it and heat again. Follow this melt, sprinkle, emboss series until you have 4-5 layers of embossing powder. You will notice that the more layers you add, the faster it melts, and the smoother the surface becomes.

4 layers of embossing powder

For the final step, take a stamp and ink it up with VersaMark, then set it aside. Melt the final layer of powder and the immediately lay the stamp in the pool of silver. Let it sit for a moment until the powder cools, then lift it off. The VersaMark should allow it to release very easily.

If your image doesn’t stamp correctly, no worries! That’s why this is the easiest, most fool proof technique out there – simply reheat the powder, let it melt again, and re stamp. You can do that over and over and over and… You get the drift!

Heart Trio

Heart

Another thing you can do is to apply these same steps to heat embossing a chipboard letter. The difference is at the very end. After stamping a pattern on the letter, heat the powder again. The stamp design will disappear, but will leave behind a streaky, almost black residue. This will add to the faux metal look, especially on a letter or small, solid embellishment.

I punched and cut my shapes out, so you still get the pattern, but not the debossed look. If you cut out a square, or cut the shapes outside the stamp line, you’ll get more of a stamped metal look. That heart trio would look awesome cut into a rectangle and left as a simple embellishment on a card front!

Heart Trio Embellishment

See the flecks of black, how it looks like a more aged metal? That’s what you get when you re heat!

You do want to be careful when cutting as, once cooled, the layers of powder can be brittle, especially if you have lots of layers, and they can crack easily. This is a cool look, if that’s what you’re going for (maybe we’ll do that next week!), but if you want a smooth surface, take your time.

Once you’re happy, make your project!

Completed Tag with Faux Metals Embellishments

Closeup

Look at the texture! And a stamp did that! That’s what I call super cool!

Now, you know you’re just itching to try this out for yourself so go do it! What are you waiting for?

Oh, you’re waiting for this…

Scrap Space - during

OK, so maybe you don’t see a big change but let me tell you, since Friday, a lot (a *lot*) of work has been done in this space – you can actually see the floor now! Wish me luck on the rest of it!

And, as always, when you try this technique I’d love to see your results, so post a pic somewhere and leave a link in the comments!

S.

Share this:

  • Click to share on Twitter (Opens in new window)
  • Click to share on Facebook (Opens in new window)
  • Click to email a link to a friend (Opens in new window)
  • Click to share on Pinterest (Opens in new window)
  • Click to share on LinkedIn (Opens in new window)
  • Click to print (Opens in new window)
  • Click to share on Tumblr (Opens in new window)
  • Click to share on Reddit (Opens in new window)
  • Click to share on Pocket (Opens in new window)

Like this:

Like Loading...

Things on Thursday – CHA Edition!

02 Thursday Feb 2012

Posted by Sara in ScrapBook, Things on Thursday...

≈ 6 Comments

Tags

Basically Bare, BoBunny, Distress Ink, Distress Markers, Heidi Swapp, October Afternoon, Ranger, ScrapBook, Simple Stories, Stampin' Up, Studio Calico, Tim Holtz, Unity Stamp Co., Washi Tape, Year Long Album

The Craft and Hobby Association (CHA) just finished up their big show in Florida where manufacturers released their new product for the year. I thought I would give you a run down of my needs!

As an aside, I had an entertaining email chat with a friend (Hi Cathie!) about the difference between wants and needs and she agrees with my reasonings for the needs list. Now I’m fully justified in buying!

1. Distress Markers. Yes, I own a zillion Stampin’ Up markers, but these are different, really and truly. They match all my Distress Ink pads! And there’s a white one too!

2. Studio Calico wood veneer shapes. I love these, they take mist and ink beautifully and look great just left plain. They’re the perfect embellishment. And they’re releasing people and cameras – perfect for my Yearlong Album!

3. October Afternoon SprINKlers. I admit to a slight problem – when I love something, I must have it in every colour (case in point, Distress Ink). And I really love the chalk finish and quick drying time of SprINKlers. Plus the new colours are amazing!

4. Heidi Swapp Memory File. I was shocked by this one, shocked. Love the system and think it’s brilliant, though I know I’ll never do it (but it really is genius). What I really want are the FotoStacks – again, perfect for the Yearlong Album.

5. Simple Stories/Unity Stamp Company. I love Simple Stories – we’re using the Year.o.graphy line for the 2012 Yearlong album – and Unity makes really great rubber stamps, so to get both in one product? Awesome! Especially when they make these, maybe my favourite release of CHA.

6. BoBunny Vintage Double Dot Cardstock. The DoubleDot has been my favourite go to cardstock – great weight, great colours, great tone on tone patterns. And now, just when I thought it couldn’t get better, it’s vintage!

7. Now, that’s not my full list, there’s still Tim Holtz/Idea-ology Chitchat Word Stickers, and washi tape galore, Basically Bare albums, Simple Stories everything (especially the pockets), stamps….. it’s all bad people, it’s all bad!

Let me know what’s on your want/need list, I may have to add it to my own! 🙂

S.

Share this:

  • Click to share on Twitter (Opens in new window)
  • Click to share on Facebook (Opens in new window)
  • Click to email a link to a friend (Opens in new window)
  • Click to share on Pinterest (Opens in new window)
  • Click to share on LinkedIn (Opens in new window)
  • Click to print (Opens in new window)
  • Click to share on Tumblr (Opens in new window)
  • Click to share on Reddit (Opens in new window)
  • Click to share on Pocket (Opens in new window)

Like this:

Like Loading...

Tuesday Techniques – Trapped Embossed Resist

31 Tuesday Jan 2012

Posted by Sara in ScrapBook, Techniques, Tuesday Techniques

≈ 9 Comments

Tags

Distress Stain, Embossing, Hero Arts, Maya Road, Perfect Pearls, Ranger, ScrapBook, Stampin' Up, Technique Tuesday, Tsukineko

One of the best, easiest, and most effective techniques I know is Trapped Embossed Resist. It takes a few steps, but it is easy, the results are always amazing, and it can be used for pretty much any project.

Supplies + Clear Embossing powder

You need a fairly small scale background stamp (I like text or script best for this but try what you have), a stamp with a good amount of both solid and open area, two colours of ink, VersaMark, and Clear Embossing Powder. Oh, and a heat tool, that helps with the embossing part!

First, use your lighter ink to stamp your background.

Stamped Tag

Next, ink up the other stamp with VersaMark and emboss with clear powder. Keep in mind that we are trapping the original design behind the second design, but still want to see part of it so VersaMark and clear embossing powder are a must, anything else will hide what we did first!

Clear Embossed Tag

It’s hard to see, but look at the shine! You’ll see the magic in just a minute….

Next, take your darker ink and rub the inkpad all over your surface. Really get it on there, you want to cover up any of the script that is not covered in embossing powder.

After that, I spray with a light mist of Perfect Pearls Mist. This is totally optional, I just like the shine, plus, I always use Distress Inks so I like how they blend when they come in contact with water. A side bonus is that it makes it easier to wipe the excess ink away!

Using a paper towel, wipe the ink off the embossed areas. You should have a beautiful, two-toned design to go play with and make into an embellishment, tag, card background, whatever your heart desires!

Completed Tag

See how the purple ink covers the pink so you don’t see any of the script, except where it’s trapped under the embossing? Awesome!

My favourite combos are Worn Lipstick and Dusty Concord, or Wild Honey and Barn Door Distress Inks. The fun is playing with different combos and stamps!

Now, go play and try this out, and please let me know if you try it – I’d love to see what you come up with!

Enjoy the storm, a snow day is a good day to hunker down and get inky!

S.

Share this:

  • Click to share on Twitter (Opens in new window)
  • Click to share on Facebook (Opens in new window)
  • Click to email a link to a friend (Opens in new window)
  • Click to share on Pinterest (Opens in new window)
  • Click to share on LinkedIn (Opens in new window)
  • Click to print (Opens in new window)
  • Click to share on Tumblr (Opens in new window)
  • Click to share on Reddit (Opens in new window)
  • Click to share on Pocket (Opens in new window)

Like this:

Like Loading...

This is me!

  • Sara

RSS Feed RSS - Posts

Enter your email address to follow this blog and receive notifications of new posts by email.

Join 996 other subscribers
Simple Scrapper Design Team

Simple Scrapper Creative Team

  • Alexa Gill
  • Allie Trumpower
  • Amy Melniczenko – Team Leader
  • Ann Tamimi
  • Arielle Gordon
  • Cathy Caines
  • Christy Strickler
  • Crystal Livesay
  • Delanie Wood
  • Jamie Leija
  • Jan Sowder
  • Jen Conlon – Social Media Manager
  • Jennifer Johnson
  • Jennifer Wilson – Owner/Editor
  • Jenny Larson
  • Kathryn Quintana
  • Kelly Sroka
  • Kimberly Kalil
  • Lisa Corbin-Polak
  • Lisa Hausman
  • Melanie Ritchie – Graphic Designer
  • Neisha Sykes – Graphic Designer
  • Nicole LeBlanc
  • Sandy Henderson
Scrapbook Steals Design Team

Flickr Photos

i ami am wordsfunny things title
More Photos

Twitter Updates

  • @berncoad @VOCMNEWS @PeterCBC @NTVNewsNL @KellyAnneNTV @CMOH_NL Drives me crazy!The moderator should put a stop to it. 1 year ago
  • #mistergabe repping the rainbow all around today and stealing my @target #targetpride hoodie. #pride🌈❤️🧡💛💚💙💜 @ Moun… twitter.com/i/web/status/1… 3 years ago
  • Flowers from Evan. 😍 #awesomeevan #sarathings robertpmendoza @ Mount Pearl, Newfoundland and Labrador instagram.com/p/BzF9AVDh37d/… 3 years ago
Follow @saracees
Follow Me on Pinterest pinterest-5ef5b.html

Categories

Ronda Palazzari Designs
Balzer Designs

Blogroll

  • Artist Wanna Be
  • Confessions of a Twenty Something Artist
  • Darrell Strickland
  • day jobs and the night life..
  • driven to ink
  • For The Love Of Art
  • Gone to the Dogs
  • Graham Case
  • Graham Case Photography
  • It's About Time…
  • pieces of my everyday life…
  • Sit, Scrap, and Relax
  • The Paperie
  • with Coffee in Hand
  • {Every Day}
Art Class Workshop
Balzer Designs Stencil 101
UberMedia Canvas Class
UberMedia Gesso

Archives

  • April 2016
  • February 2016
  • December 2015
  • November 2015
  • October 2015
  • July 2015
  • June 2015
  • May 2015
  • April 2015
  • March 2015
  • February 2015
  • January 2015
  • December 2014
  • November 2014
  • October 2014
  • September 2014
  • August 2014
  • July 2014
  • June 2014
  • May 2014
  • April 2014
  • March 2014
  • February 2014
  • January 2014
  • December 2013
  • November 2013
  • October 2013
  • September 2013
  • August 2013
  • July 2013
  • June 2013
  • May 2013
  • April 2013
  • March 2013
  • February 2013
  • January 2013
  • December 2012
  • November 2012
  • October 2012
  • September 2012
  • August 2012
  • July 2012
  • June 2012
  • May 2012
  • April 2012
  • March 2012
  • February 2012
  • January 2012

Blog at WordPress.com.

Privacy & Cookies: This site uses cookies. By continuing to use this website, you agree to their use.
To find out more, including how to control cookies, see here: Cookie Policy
  • Follow Following
    • sarathings
    • Join 316 other followers
    • Already have a WordPress.com account? Log in now.
    • sarathings
    • Customize
    • Follow Following
    • Sign up
    • Log in
    • Report this content
    • View site in Reader
    • Manage subscriptions
    • Collapse this bar
 

Loading Comments...
 

    %d bloggers like this: