• About

sarathings

~ my art, my family, my life, my stuff…

sarathings

Tag Archives: Distress Stain

April | YLA2014

13 Friday Jun 2014

Posted by Sara in Classes, ScrapBook, Yearlong Album

≈ Leave a comment

Tags

Distress Stain, Yearlong Album, YLA2014

For the April Yearlong Album class I took things a little more mixed media:

april

I love how the resist and texture turned out with the Distress Stains we used for colour:

april texture

I have to admit, resist techniques are my favourite! Give me a new resist medium, or a new way of combining resist ideas and I’m a happy little camper! 🙂

I also stick to some basics for me and one of those is this trick:

april taps

A few taps of mist or paint perpendicular to the photos to draw your eye across. If you go back through my LO’s you’ll see this trick quite a bit. I also love how it adds a bit of colour without overwhelming your nice open white space.

Things are crazy here, as always, and amping up as the weather turns (slightly) warmer. More outdoors time and less computer time so as usual, summer will be slower on the blog than usual. Of course, it’s been slow here lately anyway so you probably won’t notice a difference – oops!

One reason for the craziness is some classes I’m prepping for – and I’m excited about this one:

sneak peekA kid’s summer mini album, open to ages 10+. We’ll be playing with heat embossing, dry embossing, alcohol inks, making our own stencils, and more! Details will be added here when available but the date will be July 6. Hopefully, I’ll see some of your kiddies there!

S.

P.S. Happy Friday the thirteenth! And its a full moon to boot – let’s bring on the crazy!


Share this:

  • Click to share on Twitter (Opens in new window)
  • Click to share on Facebook (Opens in new window)
  • Click to email a link to a friend (Opens in new window)
  • Click to share on Pinterest (Opens in new window)
  • Click to share on LinkedIn (Opens in new window)
  • Click to print (Opens in new window)
  • Click to share on Tumblr (Opens in new window)
  • Click to share on Reddit (Opens in new window)
  • Click to share on Pocket (Opens in new window)

Like this:

Like Loading...

ICAD 2013 | June 10:creativity

11 Tuesday Jun 2013

Posted by Sara in ICAD

≈ 12 Comments

Tags

Distress Stain, ICAD, kidart, The Crafter's Workshop

This was a fun playing around, turned out better than I had hoped card.

I started with loads of Rock Candy Crackle Paint in the middle of the card. Once that finally dried I did layers of Distress Stain. Many, many layers!

Over that I smeared Viva Modeling Creme and had to wait again while that dried. I finally stamped the sentiment and walked away – too much waiting around for this one!

creativity

I love the texture of the crackle paint mixed with the shine of the crackle paint and the Modeling Creme:

creativity - crackle and shine

Love the final product but, since I’m not the most patient person, the waiting made me crazy!

Molly did the best card ever today:

Molly - 5

S.

Share this:

  • Click to share on Twitter (Opens in new window)
  • Click to share on Facebook (Opens in new window)
  • Click to email a link to a friend (Opens in new window)
  • Click to share on Pinterest (Opens in new window)
  • Click to share on LinkedIn (Opens in new window)
  • Click to print (Opens in new window)
  • Click to share on Tumblr (Opens in new window)
  • Click to share on Reddit (Opens in new window)
  • Click to share on Pocket (Opens in new window)

Like this:

Like Loading...

ICAD 2013 | June 8: kapow!

09 Sunday Jun 2013

Posted by Sara in ICAD

≈ 7 Comments

Tags

Distress Stain, ICAD, Viva Ferro

Not sure why I went with the cartoon-like kapow! for this card but I like it! 🙂

I started with Viva Ferro in Graphite through the 12×12 Aboriginal stencil. Once that dried I pressed Distress Stain (Barn Door, Mustard Seed, Peacock Feathers) over it and misted the heck out of it with water to blend.

kapow

I sprayed Blizzard Mister Huey’s on another index card, sketched out the letters and cut them out, then adhered them to the card. Done, with an extra bit of shimmer to go with the Ferro sparkle.

kapow - shine

The back of this card looks so cool that I think I’m going to do another one and use the back as the front – stay tuned for that one!

S.

Share this:

  • Click to share on Twitter (Opens in new window)
  • Click to share on Facebook (Opens in new window)
  • Click to email a link to a friend (Opens in new window)
  • Click to share on Pinterest (Opens in new window)
  • Click to share on LinkedIn (Opens in new window)
  • Click to print (Opens in new window)
  • Click to share on Tumblr (Opens in new window)
  • Click to share on Reddit (Opens in new window)
  • Click to share on Pocket (Opens in new window)

Like this:

Like Loading...

KP Weekend!

18 Monday Mar 2013

Posted by Sara in Cards, Classes, Techniques

≈ 9 Comments

Tags

Distress Ink, distress paint, Distress Stain, Dyan Reaveley, Dylusions Ink Spray, Gesso, Kelly Purkey, Perfect Pearls, Ranger, Stencils, The Crafter's Workshop, Tim Holtz, tissue wrap

This past weekend, The Paperie hosted Kelly Purkey and we all had an awesome time!

sara, kelly, and krista

Krista and I were lucky enough to share the teaching floor with her and do classes so there were lots of different styles and projects for participants to make. Kelly taught a LO class, plus a mini album from scratch. Krista did a completed Dear Lizzy Daybook mini and I did a tag technique workshop. Since I  don’t have any pictures on LO’s or in albums yet, I’ll show you the tags I taught and be back another time with the other goodies!

First of all we played with Dylusions Ink Spray and gesso, plus the Tim Holtz Easter Blueprints stamps (CMS144):

bunny tag

I love the texture the gesso provides!

bunny tag closeup

Then we used Distress Ink and Perfect Pearls powder to make a great background that we layered with the Vintage Things Blueprints set (CMS152):

typewriter tag

Hello, Perfect Pearls and silver gel pen:

typewriter tag closeup

We did a soft background using Distress Stains, the Sewing Room Sizzix Bigz die, and some tissue wrap:

dress tag

Love the dimension the tissue wrap adds:

dress tag closeup

Finally, we all played with the brand new Distress Paints! We marbleized, stenciled, and painted:

SAMSUNG

And added some amazing mirrored sheet letters to finish it off! Unfortunately, I only have this one cell phone picture of this tag but I’ll update with better pics tomorrow when I get my tag back.

It was a bit hairy at the end of class, trying to get them all done but all in all, I think we pulled it off and everyone liked their tags – whew! Plus, they all got to take home a new Distress Paint and a 6×6 Crafter’s Workshop stencil of their choice, pretty sweet!

The weekend as a whole, starting Friday night with a wine & cheese, leading into classes all day Saturday and then a crop, ending with another full class day on Sunday, was fabulous! I think everyone was pretty tired by the time it finished but it was worth every moment. Plus, we got to get a jumping picture with Kelly at Signal Hill in front of Cabot Tower – the icing on top of a very good weekend, even if we did freeze our faces off to get it!

jumping

S.

Share this:

  • Click to share on Twitter (Opens in new window)
  • Click to share on Facebook (Opens in new window)
  • Click to email a link to a friend (Opens in new window)
  • Click to share on Pinterest (Opens in new window)
  • Click to share on LinkedIn (Opens in new window)
  • Click to print (Opens in new window)
  • Click to share on Tumblr (Opens in new window)
  • Click to share on Reddit (Opens in new window)
  • Click to share on Pocket (Opens in new window)

Like this:

Like Loading...

Technique Tag Class | Sneak Peek!

08 Friday Mar 2013

Posted by Sara in Cards, Classes, Techniques

≈ 6 Comments

Tags

card class, Distress Ink, Distress Stain, Dylusions Ink Spray, Gesso, Kelly Purkey, technique tags, The Paperie

It’s a bit late but I’m back with sneak peeks of three of the cards for next weekend’s Technique Tag Card Class during the Kelly Purkey weekend at The Paperie!

The first one will be made using Distress Inks and Perfect Pearls:

technique tag card class sneak peek - inks and pearls

Then we’ll do a pretty one with Distress Stains and Inka Gold:

technique tag card class sneak peek - stains

And the third is made with gesso, mist, and alcohol ink!

technique tag card class sneak peek - easter

We are actually making four cards but the last one uses a top secret and very fun product so no sneaks for that one – it will be an awesome surprise to the class goers!

If you haven’t signed up for this awesome weekend – and why haven’t you? – I think there’s still a couple of spots available! Kelly is teaching a LO class and a minialbum class, Krista will be doing an Amy Tangerine Daybook, and I’ll be doing a bunch of technique tags that we’ll make into cards! Plus, there’s a meet and greet with Kelly on Friday night and a crop night on Saturday! It’s going a be full and very amazing weekend!

S.

Share this:

  • Click to share on Twitter (Opens in new window)
  • Click to share on Facebook (Opens in new window)
  • Click to email a link to a friend (Opens in new window)
  • Click to share on Pinterest (Opens in new window)
  • Click to share on LinkedIn (Opens in new window)
  • Click to print (Opens in new window)
  • Click to share on Tumblr (Opens in new window)
  • Click to share on Reddit (Opens in new window)
  • Click to share on Pocket (Opens in new window)

Like this:

Like Loading...

Index Card A Day – #7

08 Friday Jun 2012

Posted by Sara in ICAD2

≈ 4 Comments

Tags

Archival Ink, Distress Stain, ICAD, ICAD2, Index card, Lawn Fawn, Perfect Pearls Mist, Ranger, Stamper's Anonymous, The Crafter's Workshop, Tim Holtz

So, those of you who have been reading my blog know that lately I’ve been loving my my mom’s sewing machine. Earlier this week she came and took it away – to make curtains! Really, Mom, curtains? My paper crafting is soooooo much more important! 😉

Anyway, the day she came to make me cry borrow take back her sewing machine, I ran downstairs and did a quick stitch around an index card so I’d have one to play with – yesterday was the day!

I misted the card with water, rubbed Distress Stains over it, then misted with water again to make them blend even more. It’s a small miracle the card didn’t simply disintegrate under that much abuse. And I’m wasn’t finished with it yet!

I took mercy and dried the card after all that, then laid down a stencil and misted with Bronze Perfect Pearls Mist. Heat set again. I stamped the butterflies and words in Cobalt Archival Ink and the swirls (an old, old Fancy Pants set) in Coffee Archival Ink and called it done.

I love how the misting turned out – in some lights you see a small shimmer, in other lights you really see the bronze pattern. And Archival Ink is becoming a new love – I have an order placed for a bunch of new colours – yay!

I also like how the stitching turned out to be a textural component rather than a frame, as I initially intended – love when things turn out different but better than planned!

M spent most of yesterday with Nana (the sewing machine thief) baking brownies, playing with her new toys, and watching TV so an index card was pretty low on her list of priorities, we’ll see what today brings!

S.

Share this:

  • Click to share on Twitter (Opens in new window)
  • Click to share on Facebook (Opens in new window)
  • Click to email a link to a friend (Opens in new window)
  • Click to share on Pinterest (Opens in new window)
  • Click to share on LinkedIn (Opens in new window)
  • Click to print (Opens in new window)
  • Click to share on Tumblr (Opens in new window)
  • Click to share on Reddit (Opens in new window)
  • Click to share on Pocket (Opens in new window)

Like this:

Like Loading...

Some crafty goodness…

04 Friday May 2012

Posted by Sara in Cards, Classes, ScrapBook, Techniques, Yearlong Album

≈ 6 Comments

Tags

Adirondack Color Wash, Distress Stain, Paperie, Ranger, Stamper's Anonymous, The Crafter's Workshop

…as promised! Here it is!

Last weekend we had a birthday party to attend and I had to teach the Yearlong Class at The Paperie that day as well. Unfortunately, I had no card made for the party before hand. Oops! Luckily, as I was teaching one of the two bonus cards we made…

… Cathie mentioned the Distress Stain splats would make good monsters. Ummm, yes, they totally would! And I had coloured googly eyes at home – awesome! Here’s how that 3 minute card turned out:

Monsters!!!

So yeah, I totally *love* it! And I think Pine Needles might be my new favourite colour – see that fantastic greeny blue guy? He makes me happy… 🙂

The other card we did on Sunday was made using The Crafter’s Workshop Mini Fragmented Flower Stencil and mists.

I get a lot of people asking me how to mist properly and I always say to press on the nozzle. Seriously.

It seems to me that a lot of people are scared they’ll get too much colour or spray in the wrong place or something and they gingerly press down on the nozzle. Slowly. And that’s guaranteed to get you splats and drops, not mist. So just give your mist a good, solid press, people – go for it! And if you’re worried about too much colour, place your paper in a box, aim the mist at the back of the box, press down, and just let the mist drift down on your page. It’s much finer this way, but you’ll have more control about the intensity but since it’s mist, it will go where it wants, for the most part – you have very little control there, my friends!

All that being said, I thought we should have some misting practice in class! I used Adirondack Colour Wash in my sample – I love the colours and intensity of these. The trick with mist and stencils is to go light. The more mist, the more liquid, the more seepage under the stencil. So, go light and get a great impression! And use colours that will blend nicely together! And if you don’t think you have enough colour down, trust me, you do – do not spray again, it will be fine! 🙂

Anyway, simple cards, both done in about 5 minutes each, but fun techniques that can be used for a bunch of different things! If you want to see more techniques with Distress Stains, check out my Paperie Picks post from last week.

Have a fabulous weekend everyone – I’m at the Retreat and I know I’m having a great time!

S.

Share this:

  • Click to share on Twitter (Opens in new window)
  • Click to share on Facebook (Opens in new window)
  • Click to email a link to a friend (Opens in new window)
  • Click to share on Pinterest (Opens in new window)
  • Click to share on LinkedIn (Opens in new window)
  • Click to print (Opens in new window)
  • Click to share on Tumblr (Opens in new window)
  • Click to share on Reddit (Opens in new window)
  • Click to share on Pocket (Opens in new window)

Like this:

Like Loading...

Moxie Fab World Tuesday Trigger

25 Wednesday Apr 2012

Posted by Sara in Cards, Classes, ScrapBook, Techniques

≈ 2 Comments

Tags

Butterflies, Distress Stain, Moxie Fab World, Ranger, Scrapbook Adhesives by 3L, The Paperie, Tuesday Trigger

I’m playing along with the Moxie Fab Tuesday Trigger again this week. It’s a fun one that inspired one of the cards I made for last night’s Hero Arts/Studio Calico class at The Paperie.

The trigger was watercolour butterflies:

Butterfly Reverie

As soon as I saw the border of butterflies in the Calico Borders set we were using in class, I knew exactly what I wanted to do.

Watercolour Butterflies

I misted watercolour paper then coloured it with Distress Stains while it was still wet. As I was drying it with a heat tool, I kept misting to blend the colour and get water spots. I then stamped my images with black Archival Ink. I cut around the wings of two butterflies, coloured them with my favourite Sakura Stardust pen and bent the wings for dimension. I coloured the string with Distress Stain and wrapped it around the card front several times. To finish, I adhered the card front with dimensional adhesive for depth.

Love how it turned out – easy but fun and colourful!

S.

Share this:

  • Click to share on Twitter (Opens in new window)
  • Click to share on Facebook (Opens in new window)
  • Click to email a link to a friend (Opens in new window)
  • Click to share on Pinterest (Opens in new window)
  • Click to share on LinkedIn (Opens in new window)
  • Click to print (Opens in new window)
  • Click to share on Tumblr (Opens in new window)
  • Click to share on Reddit (Opens in new window)
  • Click to share on Pocket (Opens in new window)

Like this:

Like Loading...

Tuesday Techniques (on Wednesday!) – Stained Crackle

15 Wednesday Feb 2012

Posted by Sara in ScrapBook, Techniques, Tuesday Techniques

≈ 2 Comments

Tags

Distress Crackle Paint, Distress Stain, Grungeboard, Grungepaper, Ranger, techniques

This may be a day late but I hope you’ll all forgive me for once!

For this technique, you do need a very specific product, Distress Crackle Paint in Clear Rock Candy. You’re also going to need a non-stick craft sheet (to contain the mess), Distress Stains, and Grungeboard or Grungepaper.

Supplies

First, you need to die cut a shape of your choice from the Grungeboard or Grungepaper. I chose the paper as the die I used was a very thin one and unable to cut through the heavier Grungeboard. Once you have your shape, give it a decent coat of the crackle paint; the thinner the coat of paint, the finer the crackles. If you want big cracks, do a thick coat but keep in mind it will take a looooonnnnggg time to dry (this technique is very hard on the impatient!)

Wet Paint

Technically, once the paint starts to cracks, you can speed up the process with your heat tool but I normally end up burning the paper so I just let it sit. From experience, I now do this step as the last thing before I go to bed for the night and then it’s ready in the morning – no patience needed!

Dry Crackle Paint

See the cracks? Very neat on it’s own but it will get even better soon!

Now, rub your Distress Stains over the crackled shape. Dry in between layers with your heat tool and keep going until you like the look. Keep in mind that the colours lighten as they dry and you can always add more, but not less!

Staining

When you’re happy with the colours, you’re done!

finished heart

Look at the texture the crackle brings – awesome!

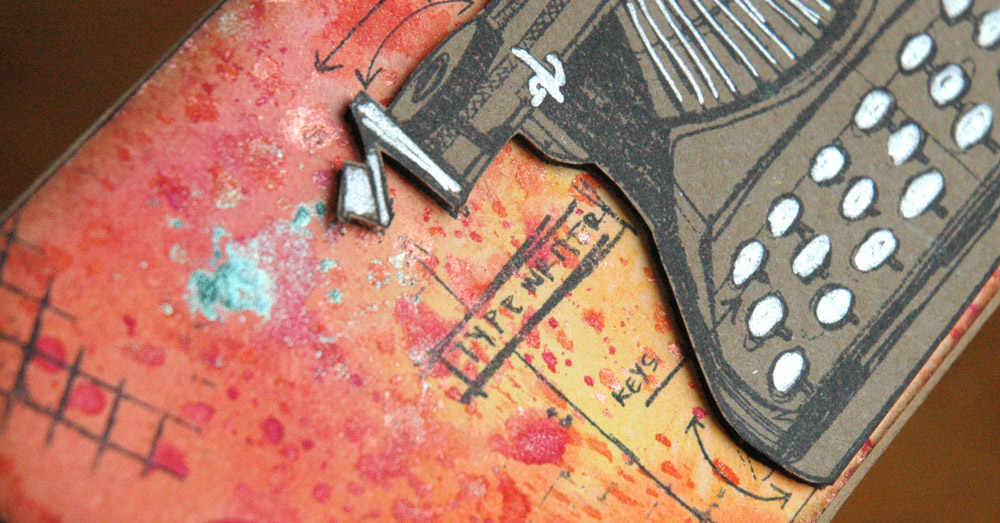
Now, add your very cool and unique embellishment to your project and call it done!

Completed Tag

I used lots of dimension on this one…

Closeup!

As a side note, you do want to use a heavy duty surface for this. Grungeboard and Grungepaper are really durable and can take a beating which I why I use them for this technique. The Crackle Paint is wet and then you’re adding wet Distress Stain so I’m not sure if regular cardstock would hold up under all of that abuse!

Now, I know you might not all have Distress Crackle Paint in your supplies, but that’s ok – I know for a fact The Paperie has some on order! Go call them and reserve yours now, then you can go play too!

I have only ever done this with Clear Rock Candy so, just for you guys, I tried it with Picket Fence (white) so see how it would turn out.

Picket Fence Crackle Paint

I do find that the colours in the Crackle Paints dry faster than the Rock Candy. They’re also matte, whereas the Rock Candy is shiny, like Glossy Accents. And that reminds me, there is a Crackle Glossy Accents, which I’ve never used. That would definitely be worth a try, if you own it.

Stained Crackle - Picket Fence

This is kind of neat too, just a pastel, matte version. Personally, I like the shine and  texture of the Rock Candy, but this would be good for other uses. Be interesting to see some others colours of paint tried too (hint, hint!).

Once you’ve tried it, leave me a link to your project – I’d love to see what you do!

Sara

Share this:

  • Click to share on Twitter (Opens in new window)
  • Click to share on Facebook (Opens in new window)
  • Click to email a link to a friend (Opens in new window)
  • Click to share on Pinterest (Opens in new window)
  • Click to share on LinkedIn (Opens in new window)
  • Click to print (Opens in new window)
  • Click to share on Tumblr (Opens in new window)
  • Click to share on Reddit (Opens in new window)
  • Click to share on Pocket (Opens in new window)

Like this:

Like Loading...

Card Day – A Step by Step Photo Show!

10 Friday Feb 2012

Posted by Sara in Classes, ScrapBook, Techniques

≈ 8 Comments

Tags

Adirondack, Craft, Distress Stain, Fiskars, Hero Arts, Ink, Non Stick Craft Sheet, Papertrey Ink, Perfect Pearls Mist, Ranger, Smooch, Stamp Press, Stamps, Unity Stamp Co.

I normally don’t consider myself a great cardmaker – I have trouble with the smaller canvas and working space, I guess – but it’s a great size for trying new things. And I like how this one turned out!

We have a birthday party tomorrow so a card was necessary. This morning, I bit the bullet and went for it, taking pics of the progress for you along the way. This is going to be really photo heavy, sorry!

Supplies

Used lots of stuff here – Papertrey Ink and Unity Stamps, Fiskars Stamp Press (go right now and buy one if you don’t have it!) and Cloud Punch, Hero Arts Long Notecards, My Minds Eye Twine, Papertrey Ink Button Twine, Ranger Archival Ink, Distress Stain, Paint Dabber, and Perfect Pearls Mist, and Clearsnap Smooch.

First, I rubbed my Distress Stains over my Non Stick Craft Sheet and sprayed lightly with Heirloom Gold Perfect Pearls Mist.

Stain and Mist

Then I dragged a piece of ivory cardstock through the colour.

Swiped through the goodness!

Now I’ve done this before and always gotten a bit of shimmer with the mist, which is what I was going for this time. But I got this instead…

Loads of Heirloom Gold!

See all that gold? Awesome! I can only figure it was because I used Stain this time instead of Ink and the consistency was different. Whatever, it looks fab, if I do say so myself!

Anyway, moving along… 🙂

I cut the card stock down to size to fit the front of the notecard, then stamped some balloon strings…

Balloon Strings

…and a sentiment from Papertey Ink.

sentiment strip

I stamped that on a bit of leftover cardstock for some more interest – and it looks cool (pat on the back)!

I then punched a couple of small holes in the balloon strings so I could tie some twine around them.

Lime Twist bow

I threaded the buttons with Rustic Button Twine, then decided to stamp a “3” and use that as a balloon instead.

Smooched "3"

And while I had the Unity stamps and the smooch out, I did the inside of the card too!

inside...

Finally, I punched some clouds and dabbed them with Pearl Paint Dabber…

Pearl coated clouds

…and adhered everything to the card!

All done!

The best thing? I still have this left over to make another one!

extra stuff!

Are you all pictured out yet? 🙂

We have the birthday party this weekend, and a fun cupcake/Valentine making event at the Paperie, and I’m teaching the Groovy Glassine Class Sunday – we’re full (for the class and the weekend)! Hope you all have a great one!

S.

Share this:

  • Click to share on Twitter (Opens in new window)
  • Click to share on Facebook (Opens in new window)
  • Click to email a link to a friend (Opens in new window)
  • Click to share on Pinterest (Opens in new window)
  • Click to share on LinkedIn (Opens in new window)
  • Click to print (Opens in new window)
  • Click to share on Tumblr (Opens in new window)
  • Click to share on Reddit (Opens in new window)
  • Click to share on Pocket (Opens in new window)

Like this:

Like Loading...
← Older posts

This is me!

  • Sara

RSS Feed RSS - Posts

Enter your email address to follow this blog and receive notifications of new posts by email.

Join 996 other subscribers
Simple Scrapper Design Team

Simple Scrapper Creative Team

  • Alexa Gill
  • Allie Trumpower
  • Amy Melniczenko – Team Leader
  • Ann Tamimi
  • Arielle Gordon
  • Cathy Caines
  • Christy Strickler
  • Crystal Livesay
  • Delanie Wood
  • Jamie Leija
  • Jan Sowder
  • Jen Conlon – Social Media Manager
  • Jennifer Johnson
  • Jennifer Wilson – Owner/Editor
  • Jenny Larson
  • Kathryn Quintana
  • Kelly Sroka
  • Kimberly Kalil
  • Lisa Corbin-Polak
  • Lisa Hausman
  • Melanie Ritchie – Graphic Designer
  • Neisha Sykes – Graphic Designer
  • Nicole LeBlanc
  • Sandy Henderson
Scrapbook Steals Design Team

Flickr Photos

i ami am wordsfunny things title
More Photos

Twitter Updates

  • @berncoad @VOCMNEWS @PeterCBC @NTVNewsNL @KellyAnneNTV @CMOH_NL Drives me crazy!The moderator should put a stop to it. 2 years ago
  • #mistergabe repping the rainbow all around today and stealing my @target #targetpride hoodie. #pride🌈❤️🧡💛💚💙💜 @ Moun… twitter.com/i/web/status/1… 3 years ago
  • Flowers from Evan. 😍 #awesomeevan #sarathings robertpmendoza @ Mount Pearl, Newfoundland and Labrador instagram.com/p/BzF9AVDh37d/… 3 years ago
Follow @saracees
Follow Me on Pinterest pinterest-5ef5b.html

Categories

Ronda Palazzari Designs
Balzer Designs

Blogroll

  • Artist Wanna Be
  • Confessions of a Twenty Something Artist
  • Darrell Strickland
  • day jobs and the night life..
  • driven to ink
  • For The Love Of Art
  • Gone to the Dogs
  • Graham Case
  • Graham Case Photography
  • It's About Time…
  • pieces of my everyday life…
  • Sit, Scrap, and Relax
  • The Paperie
  • with Coffee in Hand
  • {Every Day}
Art Class Workshop
Balzer Designs Stencil 101
UberMedia Canvas Class
UberMedia Gesso

Archives

  • April 2016
  • February 2016
  • December 2015
  • November 2015
  • October 2015
  • July 2015
  • June 2015
  • May 2015
  • April 2015
  • March 2015
  • February 2015
  • January 2015
  • December 2014
  • November 2014
  • October 2014
  • September 2014
  • August 2014
  • July 2014
  • June 2014
  • May 2014
  • April 2014
  • March 2014
  • February 2014
  • January 2014
  • December 2013
  • November 2013
  • October 2013
  • September 2013
  • August 2013
  • July 2013
  • June 2013
  • May 2013
  • April 2013
  • March 2013
  • February 2013
  • January 2013
  • December 2012
  • November 2012
  • October 2012
  • September 2012
  • August 2012
  • July 2012
  • June 2012
  • May 2012
  • April 2012
  • March 2012
  • February 2012
  • January 2012

Blog at WordPress.com.

Privacy & Cookies: This site uses cookies. By continuing to use this website, you agree to their use.
To find out more, including how to control cookies, see here: Cookie Policy
  • Follow Following
    • sarathings
    • Join 316 other followers
    • Already have a WordPress.com account? Log in now.
    • sarathings
    • Customize
    • Follow Following
    • Sign up
    • Log in
    • Report this content
    • View site in Reader
    • Manage subscriptions
    • Collapse this bar
 

Loading Comments...
 

    %d bloggers like this: