Gelli Plate Printing |Guest Post: Karen

Tags

, , ,

I’m on vacation for a few days to visit my brother and his lovely (and pregnant!) wife. While I’m away some of my favourite local artists and bloggers have agreed to do posts for you! Today, Karen shares her newfound love of the Gelli Arts Gel Printing Plate. Enjoy!


I was honoured when Sara asked me to guest post for her blog while she is vacationing. Hope you are having a great time Sara!

Last week, I bought a Gelli Arts Gel Printing Plate and I have been having a blast learning and experimenting with different kinds of prints. I have created lots of fun backgrounds for art journal pages, but I was even more delighted when I realized the great backgrounds I could make for my scrapbook pages!

Today I am sharing my very first gel print scrapbook layout. Hooray!

For my print I used two colours of Silks Acrylic Glaze- Watermelon Mist and Carmen.

First I did a very simple layer of Watermelon Mist (pink). I just spread the glaze on the plate, put the paper on and pulled it off.

1

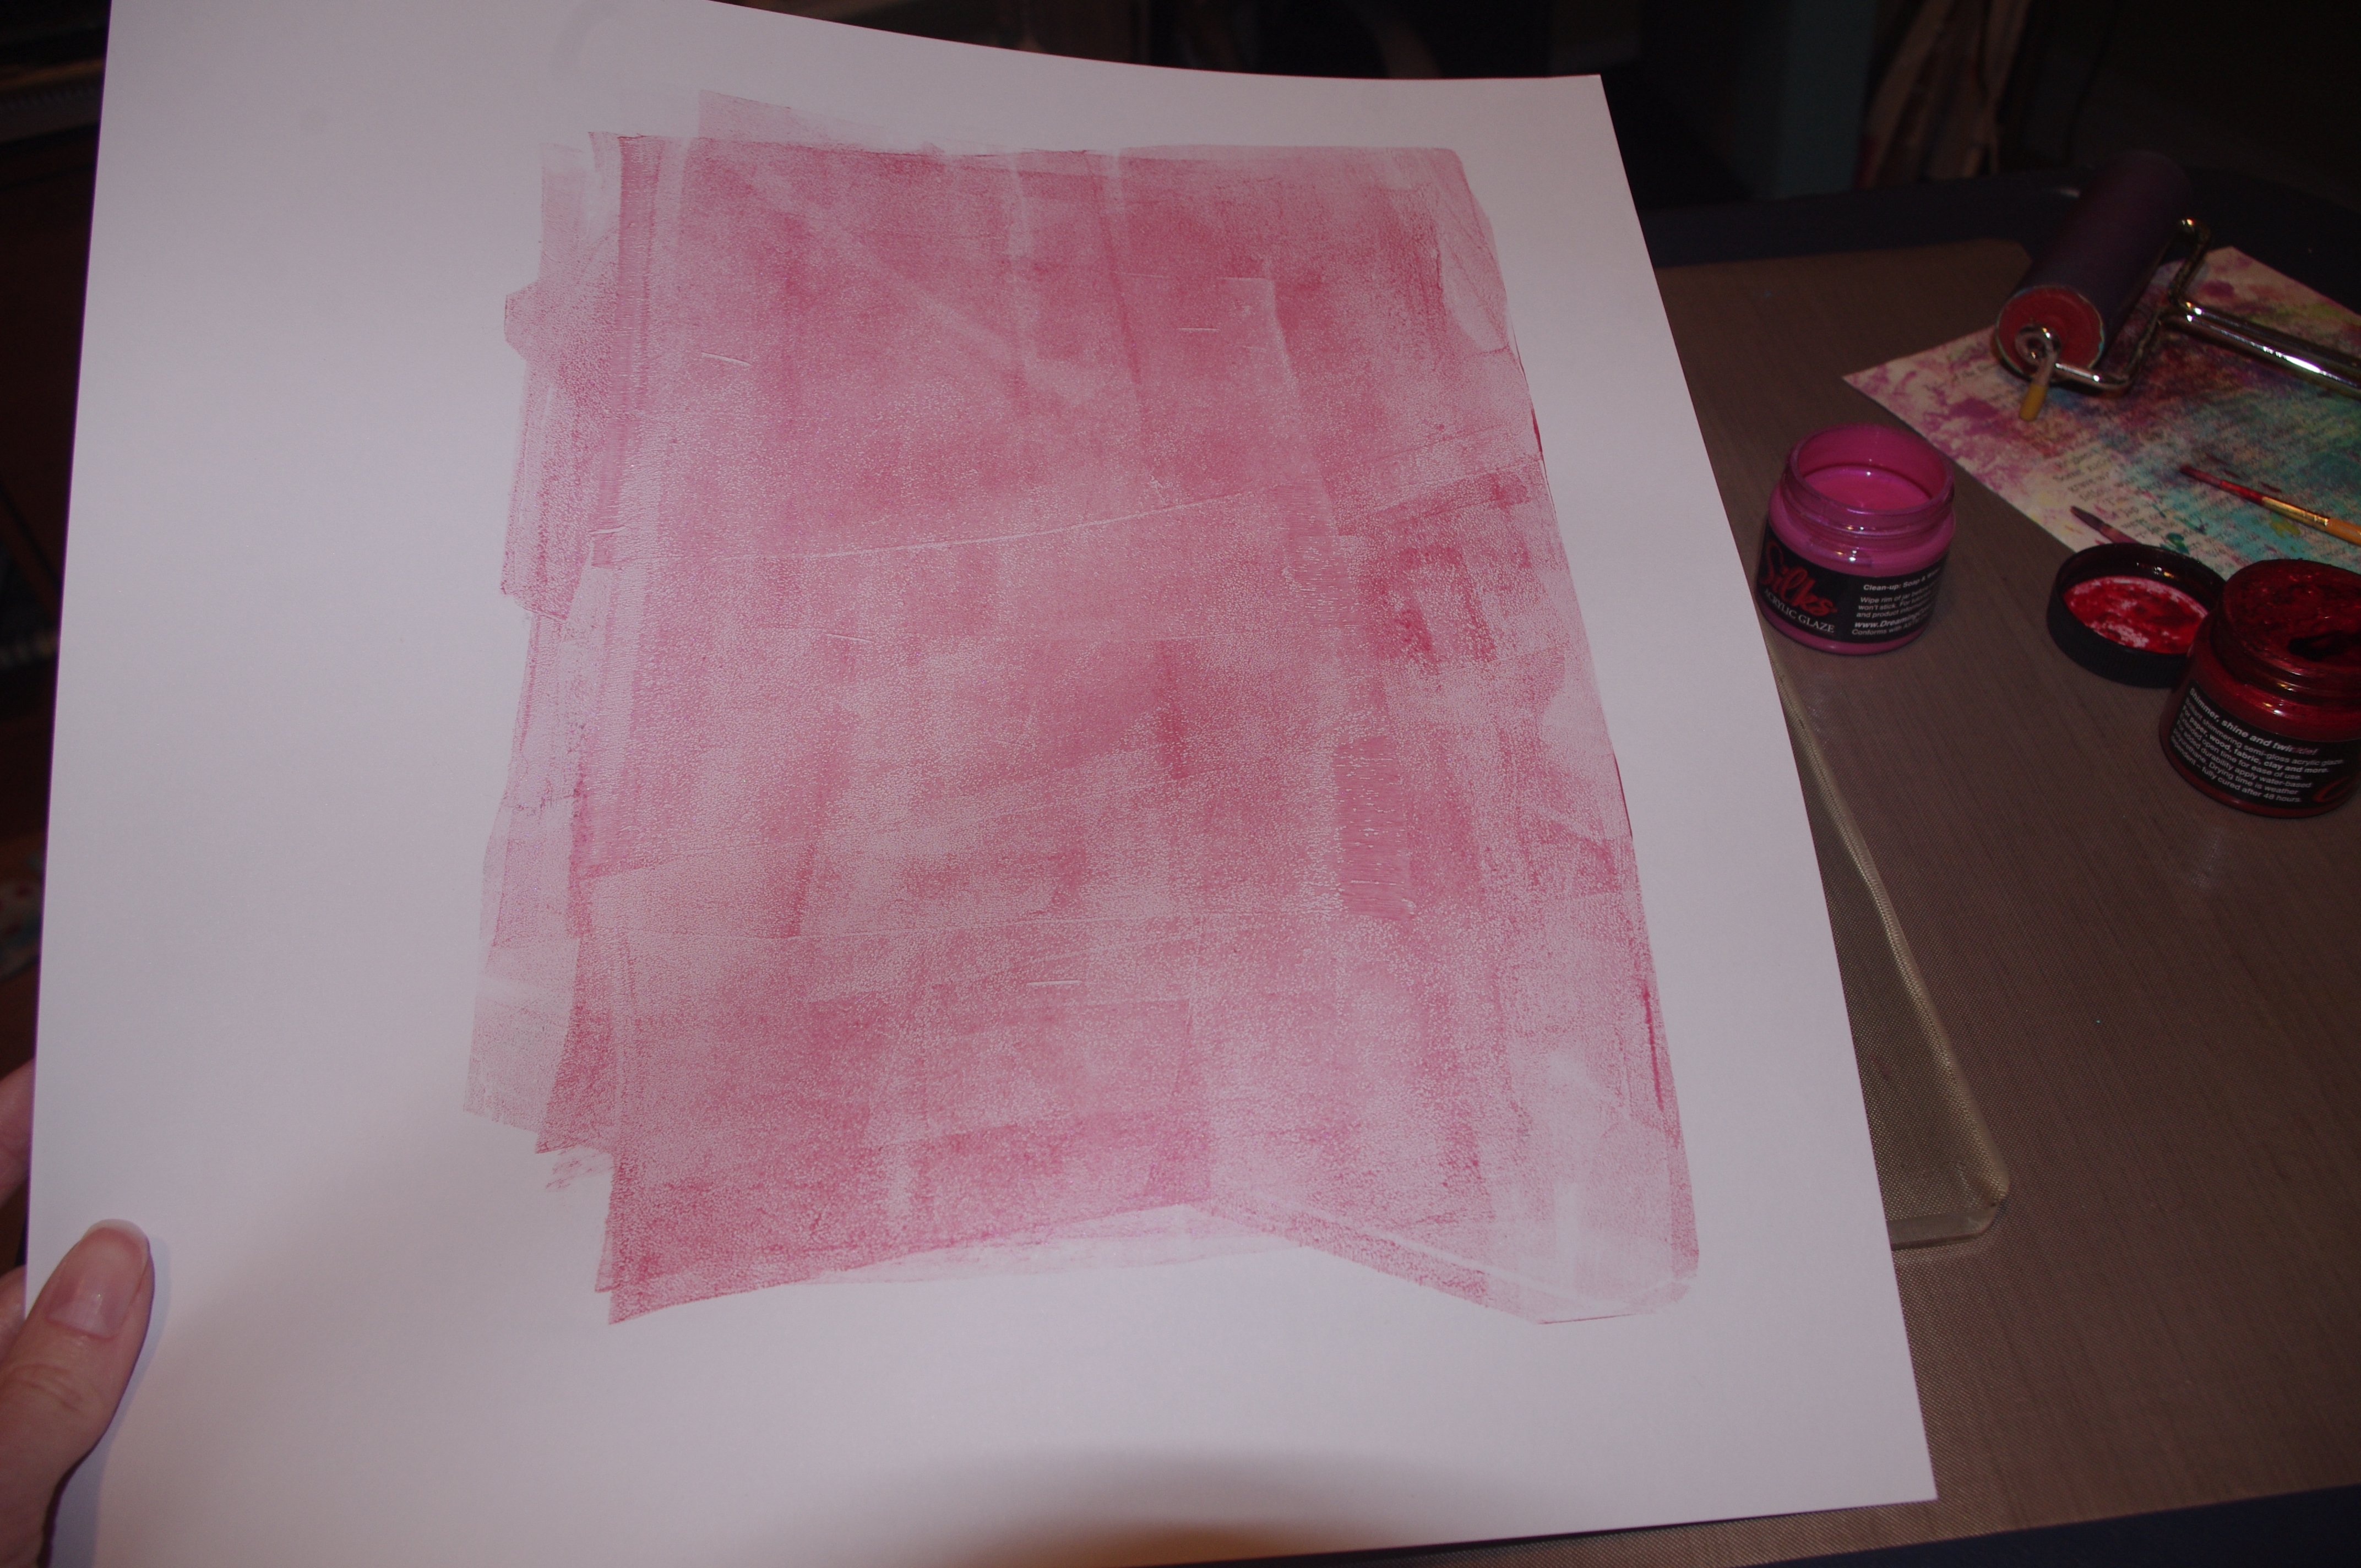
For my second layer, I spread on some Carmen (red). I pressed down a stencil and while the stencil was on the plate I used a roller dots stamp over the plate for extra texture.

2

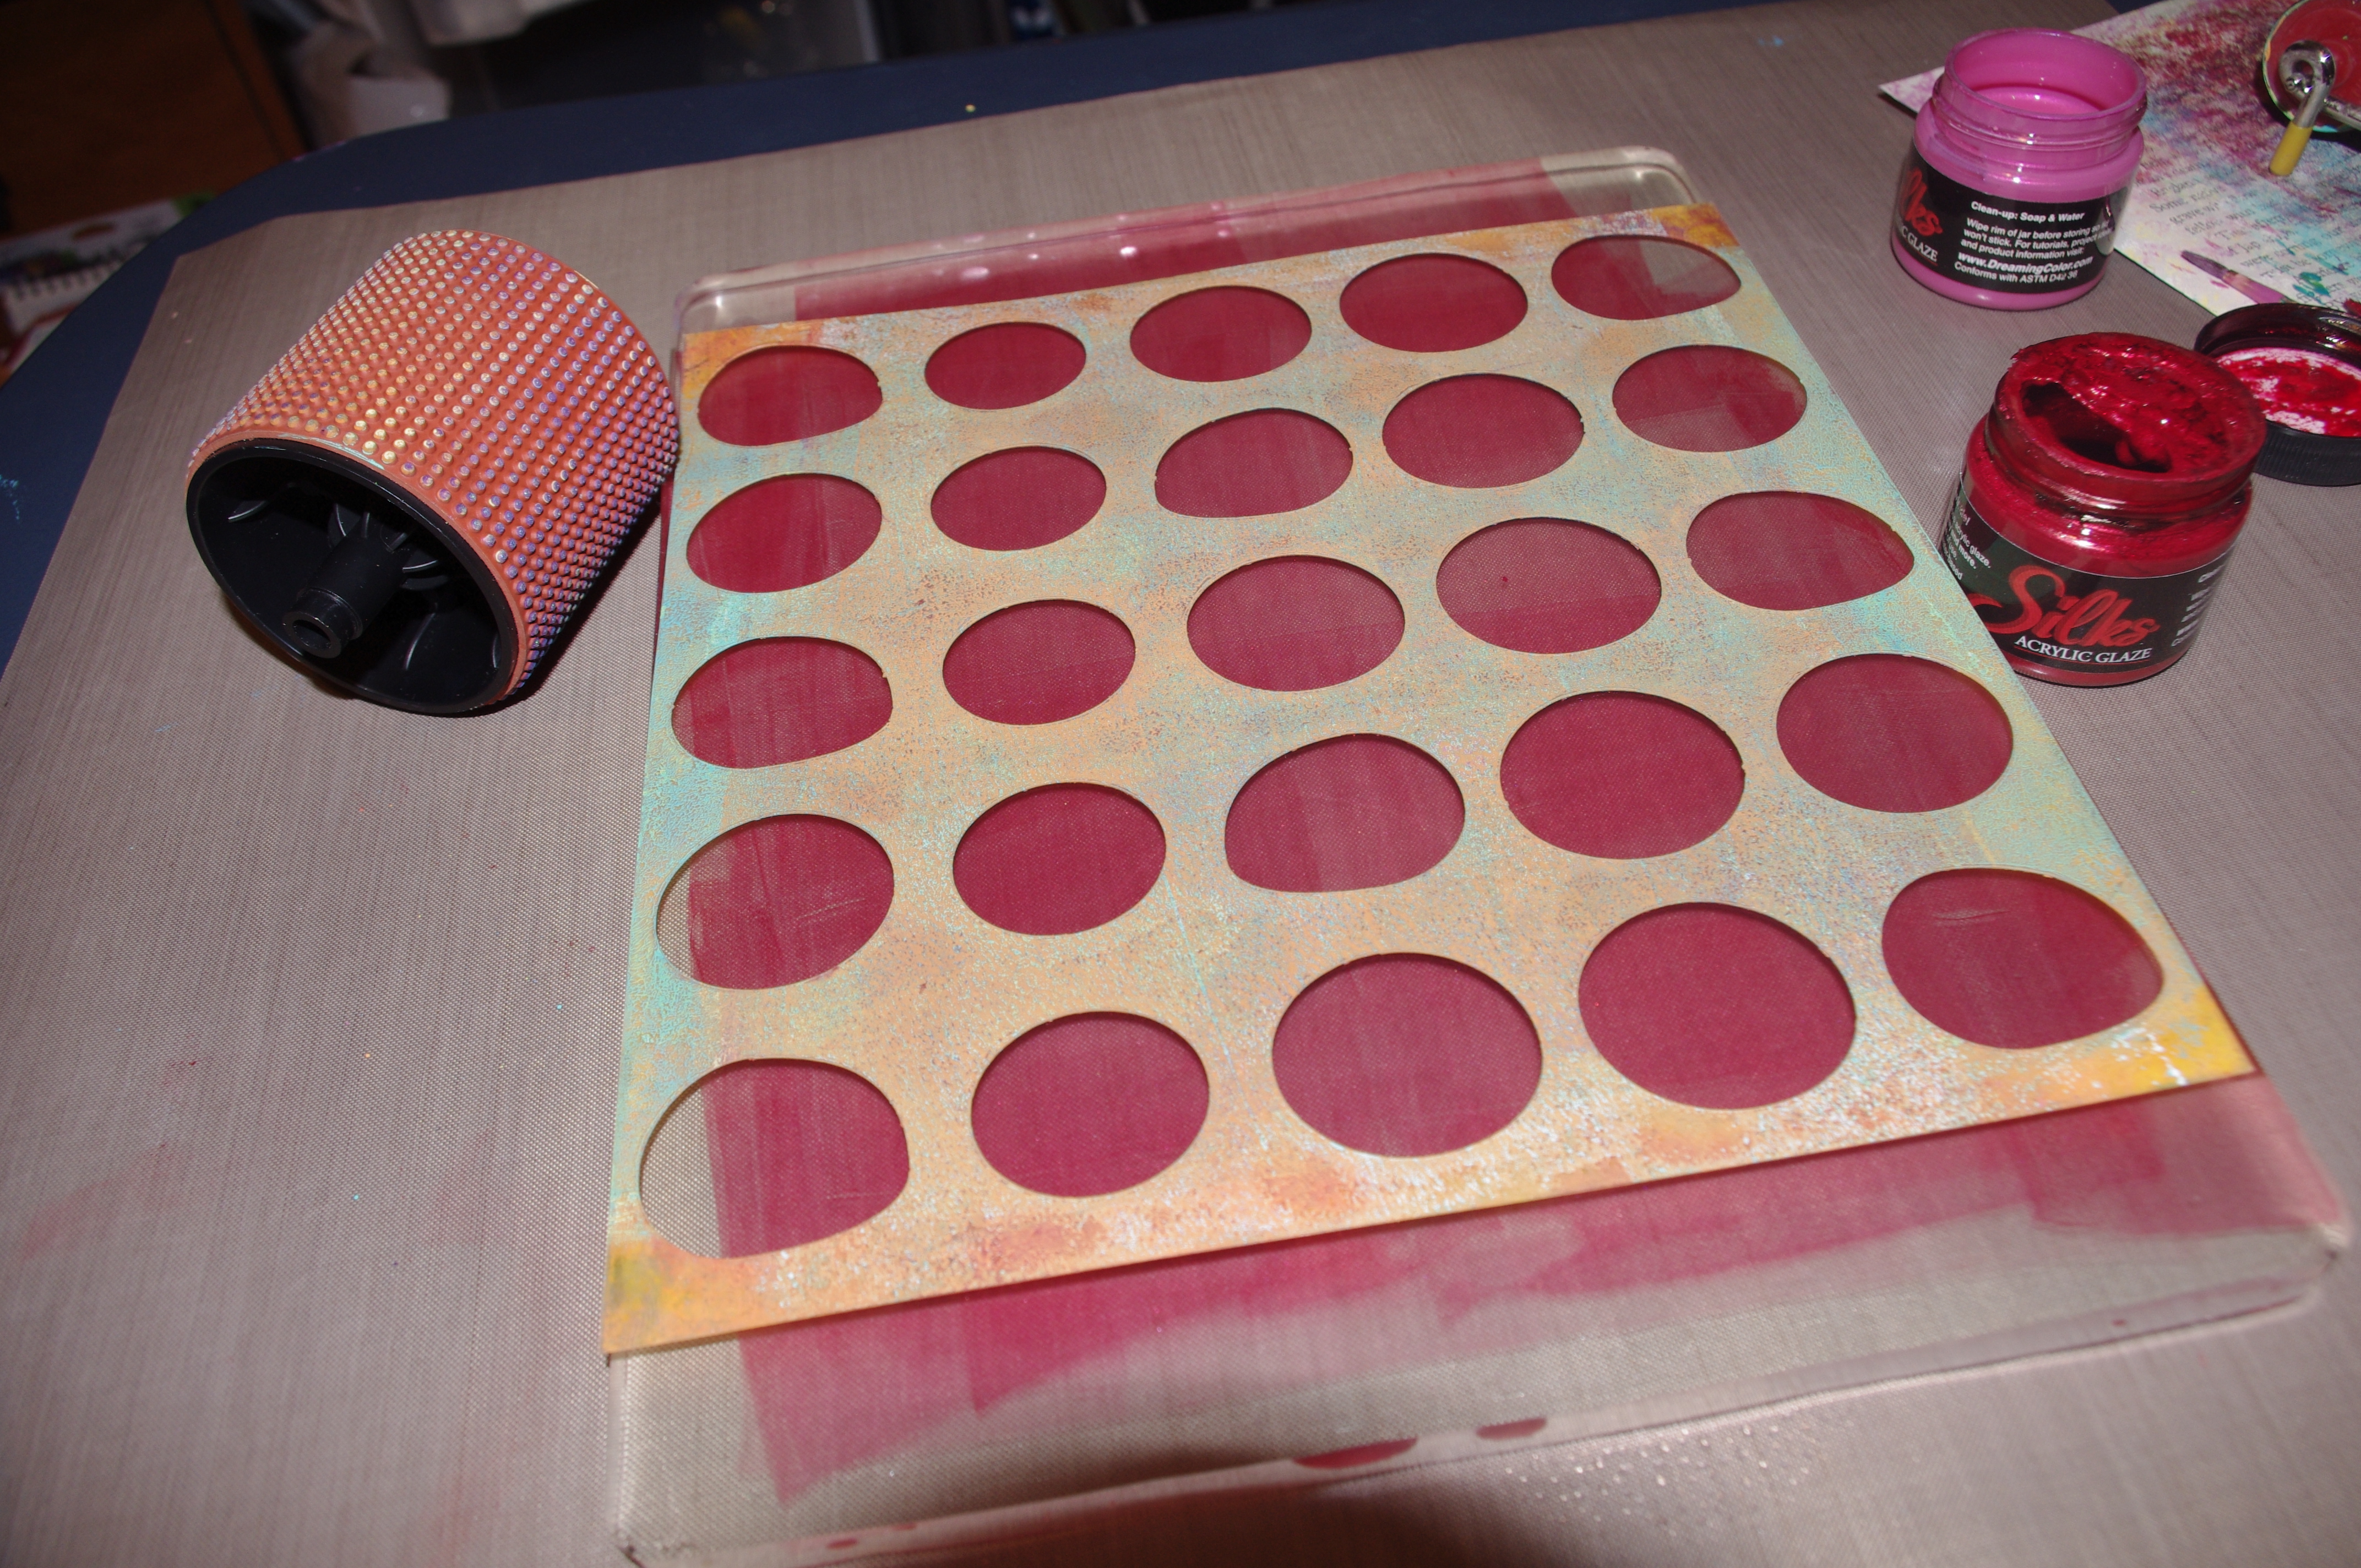
Then I lifted the stencil before applying the paper.

3

Here’s what it looks like after the pull! Love it!

4

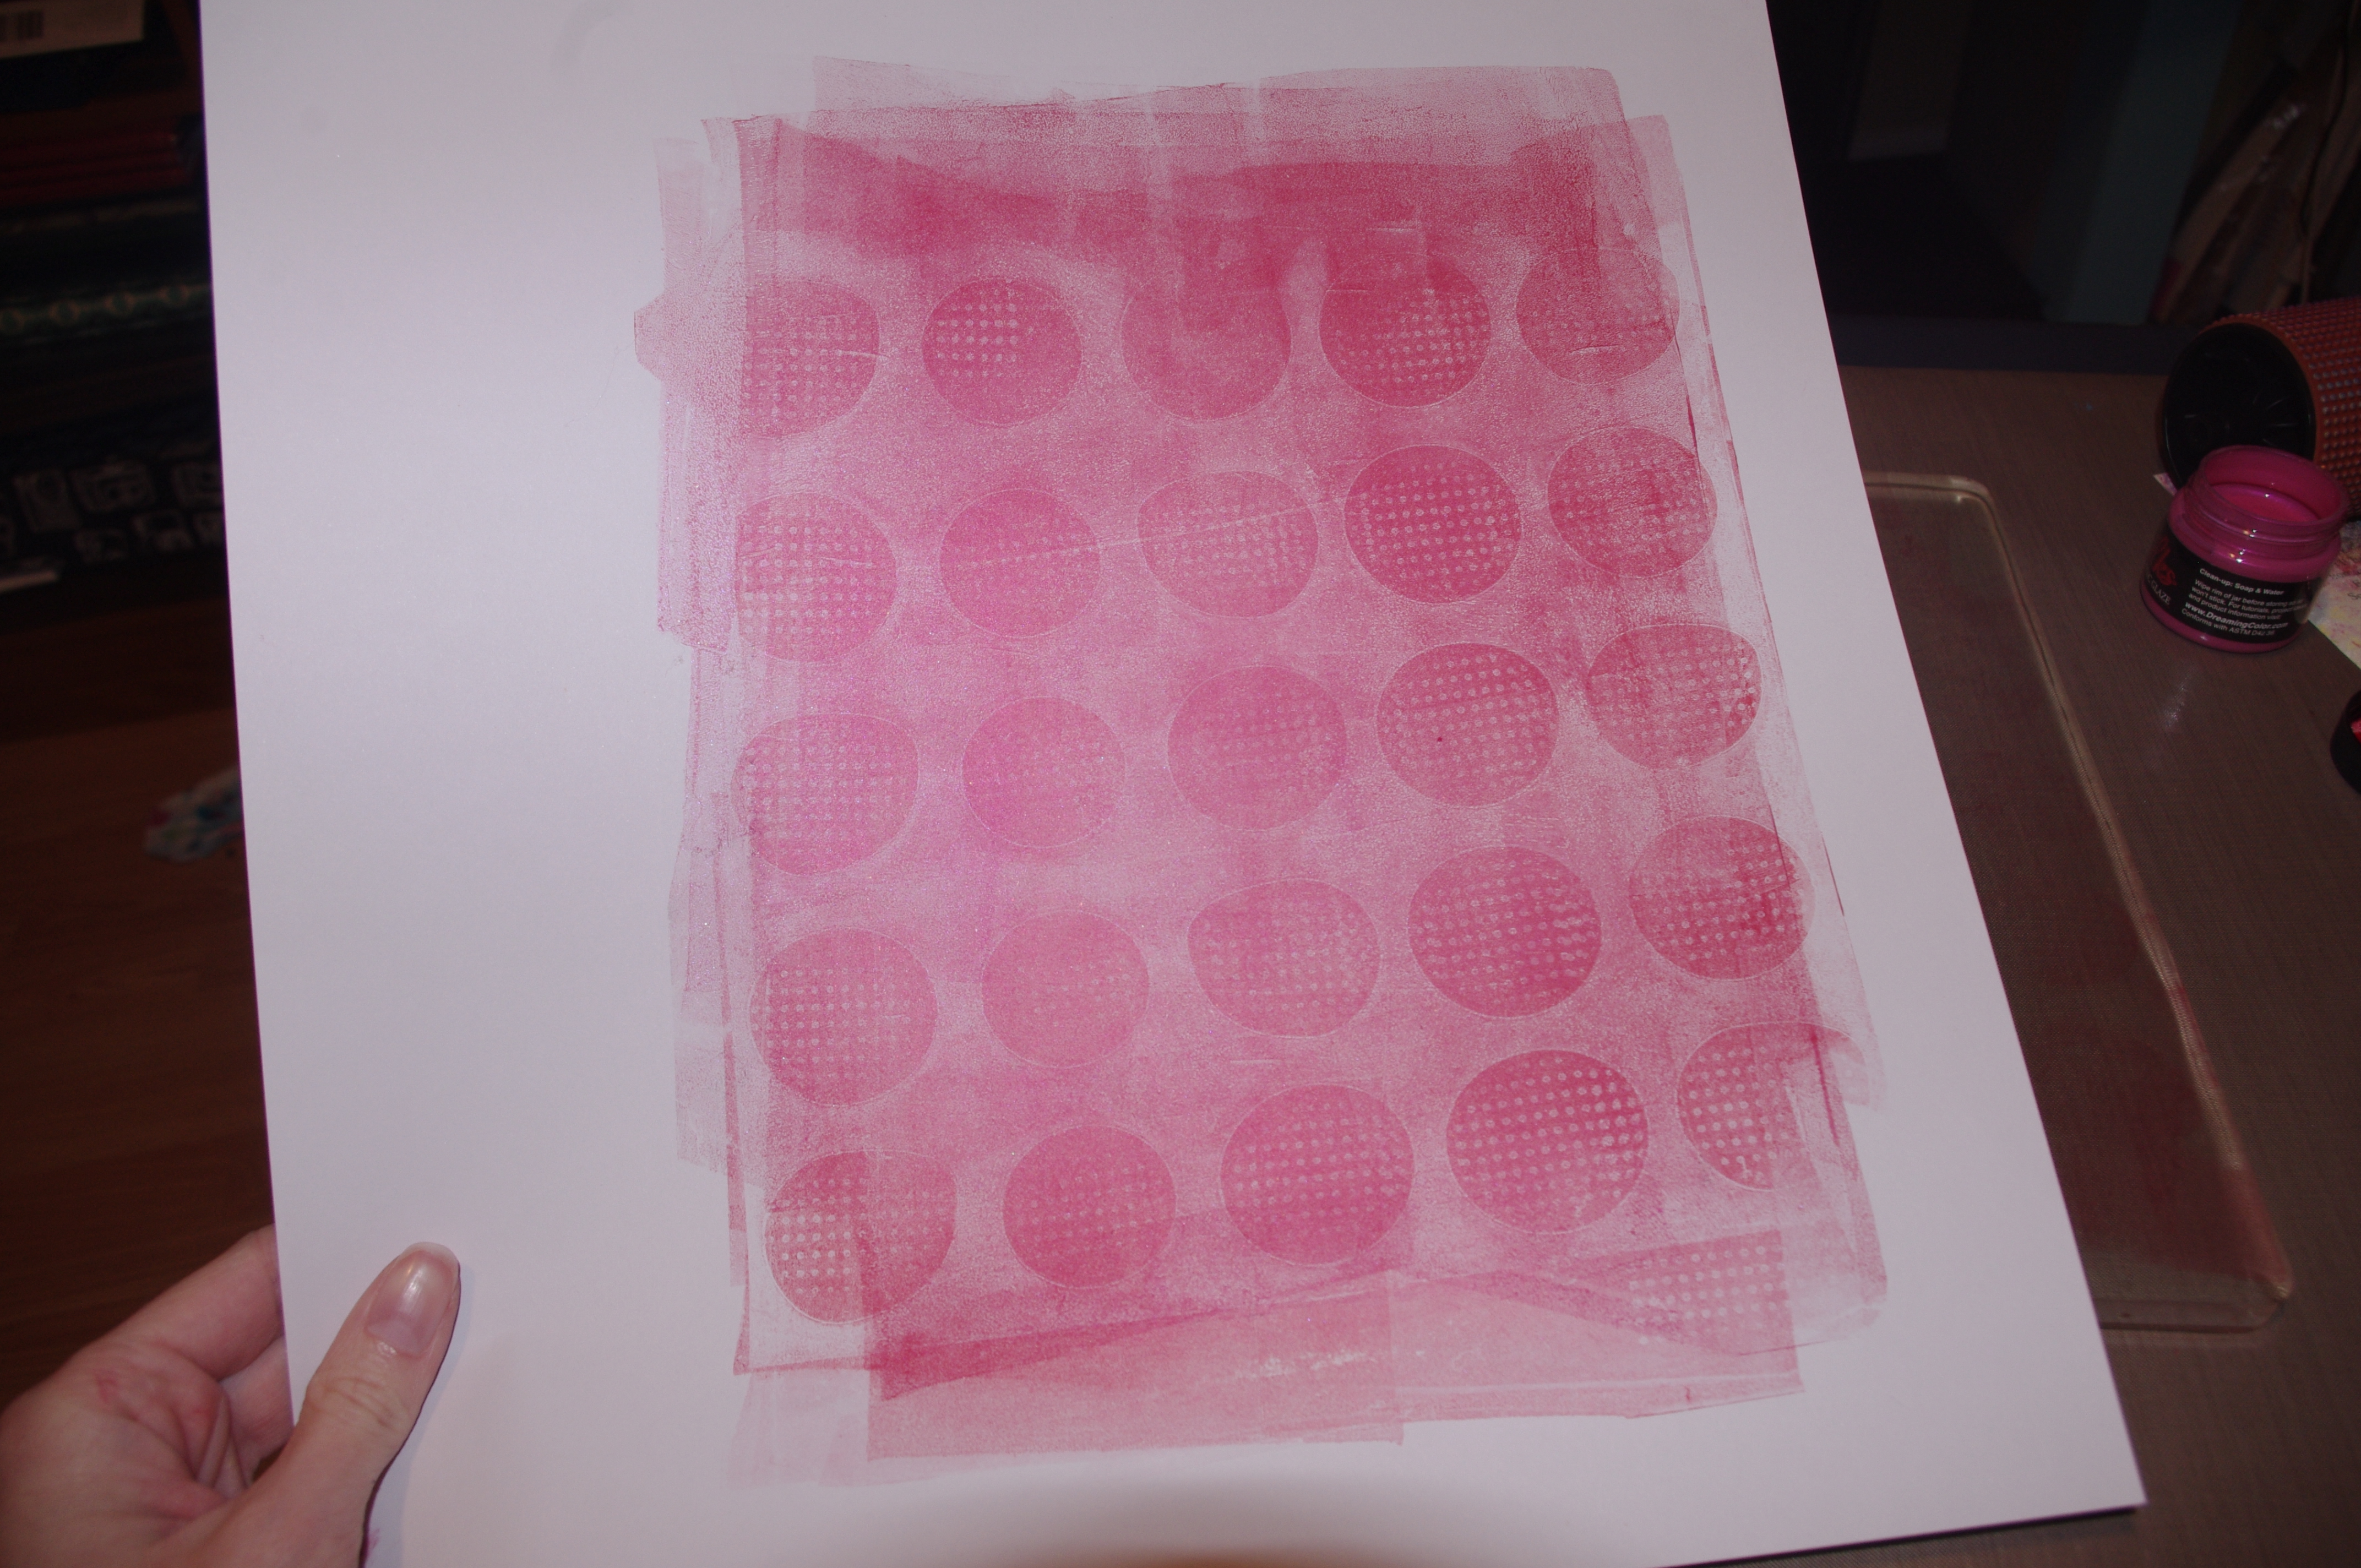
What a great base for a page right?! Next I chose some paper from the Simple Stories I {Heart} Summer line, which I just love, by the way. And once I added a few embellishments it was done.

5

So it’s official – I am in love with the Gelli Plate! How about you?!

Karen

You can check out more of my stuff on my blog at http://sitscrapandrelax.wordpress.com

Art Book | Guest Post: Marg

Tags

,

I’m on vacation for a few days to visit my brother and his lovely (and pregnant!) wife. While I’m away some of my favourite local artists and bloggers have agreed to do posts for you! Today, Marg shares a fun Art Book she taught to a group of young girls. Enjoy!                                                                            

Thanks, Sara for asking me to be a guest blogger.

On November 11, four wonderful nine-year-old girls came over to my house and we had so much fun making an Art Book.

This is my Art Book:

1

Here is the inside of my book:

2

In making these books we used Watercolour Paper, Golden Reg Matte Medium, Claudine Hellmuth Sticky Back Canvas, Stencils, Tissue paper,Tattered Angels Chalkboard Mist, Maya Road Chipboard pieces, Studio Calico Mistables, Basic Liquitex acrylic paints, Dylusion Stamps, Inka Gold, Permaopaque pens, Sizzix and Magazines.

I showed the girls my book and they proceeded to make their own. All were so different and they were all so wonderful! It was so nice watching their imaginations at work.

Here are two of the girl’s books:

Claire’s Book

3

Jordan’s Book

4

I love working with children because they get so excited and have so much imagination which they are not afraid to follow. We should be so lucky.

If you have young children make sure they have time to experiment with art. Sit back and enjoy their inhibitions when they are creating.

Take Care

Marg

Pan Pastels | Guest Post: Tanya

Tags

, ,

I’m on vacation for a few days to visit my brother and his lovely (and pregnant!) wife. While I’m away some of my favourite local artists and bloggers have agreed to do posts for you! Today, Tanya shares her love and amazing use of PanPastels. Enjoy!


I’m excited to guest blog for Sara and share my new favorite thing – pan pastels! I’ve been eyeing them for ages, but resisted buying until I took a class at The Paperie by Cathie Reed. After that, I had no choice but to buy them, I was hooked. I love to make backgrounds for projects with pan pastels.

You can read more about pan pastels here.

The first project is so simple and fast to make and you just need one pan pastel – that’s right – just one, so if you are interested in experimenting with them, you don’t need to spend a lot to try it out.

1

Gather your supplies. Here is a list of what I used:

  • Ultramarine blue pan pastel and sofft sponge
  • Spectra fix
  • Bristol paper (You can use whatever you have on hand, this was the closest for me to grab)
  • Stamps
  • Versa mark
  • tape
  • Some embellishments (of course!)

Cut your paper to the size of the card you want to make. Gently swipe the sponge over the pan pastel two to three times and color in the paper with swiping motions, like using a paint brush. If you have loose pastel powder on the surface of the pan pastel, then you are using too much pressure when swiping up the color.

2

Once you have it all colored in and at the shade you like, ink up your stamp with versa mark and stamp. It won’t be very visible. Add some more pan pastel. Ta da – the magic happens!

3

You then have to spray it with a fixative so it will set. I like the spray spectra fix, safe and no odor. It takes about 1-2 minutes for it to evaporate and dry.

Add your sentiment stamp, embellishments and adhere it to a card base. Easy peasy, you are done.

4

This technique would work fabulously on a 12x 12 layout or canvas.

The next background I want to show you is on a canvas. For this project I used:

  • Canvas
  • Tissue paper
  • Cheese cloth
  • Matte multi-medium
  • Various papers ( I used cut up gift wrap that looked like tickets)
  • Gesso
  • Pan pastels and sofft sponges
  • Fixative spray

5

I crumpled up some plain white tissue paper and adhered it on the canvas with the multi medium. I did the same with the cheese cloth and paper. Remember to put the multi medium under and over what you are putting on the canvas.

6

Once that was dry, I put a thin coat of gesso over the whole canvas with a paint brush. The gesso helps the pan pastels go on so smooth and tones down your paper colors a little.

7

That layer dries much more quickly than the multi medium. Now you are ready to add the color goodness of pan pastels.

8

I used ultramarine blue shade all over the canvas the same way I did the paper for the card.

I love how the texture of the tissue paper:

9

and cheese cloth:

10

picks up the color.

I then sprayed with the fixative and once it was dry, I added more color. This time I used phthalo blue to shade and paynes grey for the edges. Of course, I sprayed with the fixative again.

11

Now you have a great background complete. I will admit, I did have a lot of backgrounds done on canvas, but I used them all up at the retreat. It seems so much faster to work on a canvas without having to do the background prep.

This is what I did with this background:

12

That’s all folks, and thanks for letting me share my new love, Sara!

Tanya

A little bit puzzled…

Tags

,

A while ago I posted that I did an altered puzzle with some friends at a crop. Just after that, a group I’m a part of decided to do a larger version and almost 20 of us signed up. We have until the end of January to get the pieces altered and back to the original owners so I’m taking my time getting them done. That being said, I do have a few completed and I though I’d share them!

A bit of floral:

beautiful

A bit of shimmer:

shine

Especially in the light!

shine - shimmer

A bit of dreaming:

wish

A bit of encouragement:

believe

A bit of a mess:

be yourself

I’ll be changing and fixing that one so be on the lookout for the revamped version!

I’m having a blast making and receiving these. For those ladies who have sent theirs back to me already – I really love them, my puzzle is already starting to look awesome! To those ladies who want their pieces back – they’re coming. Eventually. Before the end of January anyway. 🙂

On another note, Gabe and I are flying to Ottawa with my mom tomorrow to visit my brother, sister-in-law, and the baby girl bump! While I’m away I’ve lined up a few of my very talented friends to blog for you. You’re in for a treat over the next few days, they have some awesome posts done so enjoy and hopefully you’ll find some fun new blogs to follow!

S.

Yearlong Album Class | 2013

Tags

,

I promised the students in my YLA2013 class that I would post all the LO’s we’ve done so far. Except for the most recent class (October LO – UTEE resist) they are all now posted on my Flickr account, in the Yearlong Album 2013 set.

July - happy boy

July – happy boy

And class peeps, just drop me a line if you have any questions!

S.

12 on Twelve | November 2013

Tags

12on12november1. Unpacking and putting away after the Paperie retreat

2. making puzzles

3. fresh rolls (thanks Mom!)

4. standard selfie in the porch

5. gobbling down supper – pea soup is her fave!

6. colouring pictures

7. swimming lessons

8. good night, my baby.

9. good night, sweet boy.

10. first How To-sday post for Scrapbook Steals went live today

11. doing laundry and watching The Voice

12. goodnight me


S.

Distress Ink Backgrounds | Scrapbook Steals

Tags

, ,

Remember back when I used to do a Tuesday Technique? They were fun, right?

Well, I didn’t have time to keep doing those each week but luckily for you, Scrapbook Steals does one each and every Tuesday on their blog!designteam-fallwinter

Today, and once every month, I’ll be the How To-sday blogger over there and today is my first post – Distress Ink backgrounds.

photo 7

Go take a look and try it out – fun times will ensue, I promise!

S.


Lest we forget….

Today is Remembrance Day in Canada, and most of the other Commonwealth countries.

For all those serving, or who have served, thank you. We will never forget.

But I really hope the message in this cartoon always stays true for my children, and theirs.

credit: Lynn Johnston

credit: Lynn Johnston

S.

Halloween!

Tags

So. Halloween was pretty epic this year.

halloween - my two

We had a fall fairy who morphed into a pirate for the actual door-to-door part of the festivities:


halloween - fairy1

and Terry the Fox,who carried an awesome sign with him.

halloween - fox1

There were of course the parties at school, and Sparks, and we naturally had one here!

halloween - snacks

And it was very loud in my little house with all those hyped up kiddies.

halloween - group1

Then the trick or treating began and my two were 100%, wholly into it this year.

halloween - trick or treating

To make it even more fun, their friend J went to a few houses with them and he was so excited that he was literally jumping up and down on the doorsteps!

batman

Isn’t he the cutest?

A few visits to friends, and we ended the (very cold) evening at my Dad’s, as usual, for a late supper. Fun times, a fair amount of sugar, and two very tired little people.

It was awesome.

S.

Paperie Card Kit | November 2013: Part 2

Tags

, , , ,

Yesterday I shared some of my work from the Paperie Card Kit and today you get to see the rest!

I did one more LO, as usual:

we wanted a cat

I had fun punching and adding circles:

we wanted a cat - circles

and playing with embellishments:

we wanted a cat - embellies

For once I actually made cards with the Card Kit – go figure! I had run out of cardstock so I cut up a piece of white woodgrain from my stash for the card bases.

smile

They’re super simple but they make use of the fun Lawn Fawn birthday stamp set that’s included. Perfect for kiddies birthdays and we always have lots of those to go to!

cake and enamel dots

I also made one card that will probably go to my dad, who owns his own sailboat:

ahoy

Finally, I made a wreath. This actually caused me some stress because I had planned to make a wreath thinking that the November kit would of course be full of fall-like colours. Ummm, not so much. The pale pinks, blues, and yellows threw for a bit but that wreath was stuck in my head so onward I went:

wreath

Not bad, hey? I used some of the 6×6 patterned papers, as well as one of the kraft and one of the white envelopes included. A bit of distress ink and I think it turned out rather fall-like after all!

wreath - acorn

The wreath base was wrapped with burlap ribbon, then I pinned the leaves in place and the acorns were handcut and glued. Easy but I love how it turned out!

I’ll be back tomorrow with some Halloween pics – I been meaning to post them but time has gotten away from me!

S.