• About

sarathings

~ my art, my family, my life, my stuff…

sarathings

Category Archives: Guest Post

Just Cuz…

03 Friday Apr 2015

Posted by Sara in Guest Post, Mixed Media, Tutorials

≈ 3 Comments

Tags

Mixed media, Scrapbook Layout, Tutorial

Edit: The post is up now!

When I first started blogging I used to do a weekly series called Tuesday Techniques. I loved it but it was super time-consuming and I just couldn’t keep up. So they stopped. However, those posts are still my most visited and pinned, by far and that’s why this post should make many of you very happy. 🙂

06 - title and embellies

Sam, Brittany, and Sarah from DIY Just Cuz contacted me a little bit ago to ask if I’d consider doing a guest post for their Scrapbook Series. And then they gave me free rein, as long as I stuck to a current trend, or tip and tricks post. Seriously??? How could I turn that awesomeness down?

So head on over to DIY Just Cuz and check out my step by step tutorial for watercolour backgrounds. Then go take a look at the rest of their blog, it’s a ton of fun!

Cheers!

S.

Share this:

  • Click to share on Twitter (Opens in new window)
  • Click to share on Facebook (Opens in new window)
  • Click to email a link to a friend (Opens in new window)
  • Click to share on Pinterest (Opens in new window)
  • Click to share on LinkedIn (Opens in new window)
  • Click to print (Opens in new window)
  • Click to share on Tumblr (Opens in new window)
  • Click to share on Reddit (Opens in new window)
  • Click to share on Pocket (Opens in new window)

Like this:

Like Loading...

Emergency Art Kit for Children of All Ages | Guest Post: Vicky

27 Wednesday Nov 2013

Posted by Sara in Guest Post, This & That

≈ 1 Comment

Tags

Art Kit, Guest Post

I’m on vacation for a few days to visit my brother and his lovely (and pregnant!) wife. While I’m away some of my favourite local artists and bloggers have agreed to do posts for you! Today, Vicky Taylor-Hood (with help from her daughter Katherine) shows you how to put together an awesome art kit. Enjoy!


When I was a little girl, visiting my grandmother, the best visits involved time in her studio. We would break out the paints and paper and she would show me the way in which she could make the picture in her head soar and land on the blank sheet before us, imprinted on paper with pencil or brush. Smelling new, cold-pressed watercolour paper still reminds me of her and those afternoons in her chilly studio working with real artist’s materials.

Maybe that’s why, when Katherine was growing up, I never really used kid materials for her once she was old enough not to eat them. Katherine quickly graduated to Winsor & Newton watercolour paints and used my good (but not best) brushes. We used real watercolour paper, not just white printer paper, whenever possible, even if it wasn’t the really good kind. Pastels, both chaulk and oil, were a messy afternoon of fun. We got Jones Tones Plexi glue everywhere and I learned how to get acrylic paints out of the hair of a four-year-old.

Working with children on a myriad of art projects has taught me many things. I can now grab and keep the attention of a herd of eight-year-olds with the wave of a brush. There’s a magic to art that enthrals them and an exhilaration in being a performing visual artist for a rapt audience. I have also learned that the results of children are dramatically improved when they are provided with decent-quality materials. While you don’t need to have the absolute best of everything (who could afford that?), buy the most decent quality that you can afford, especially of the basics.

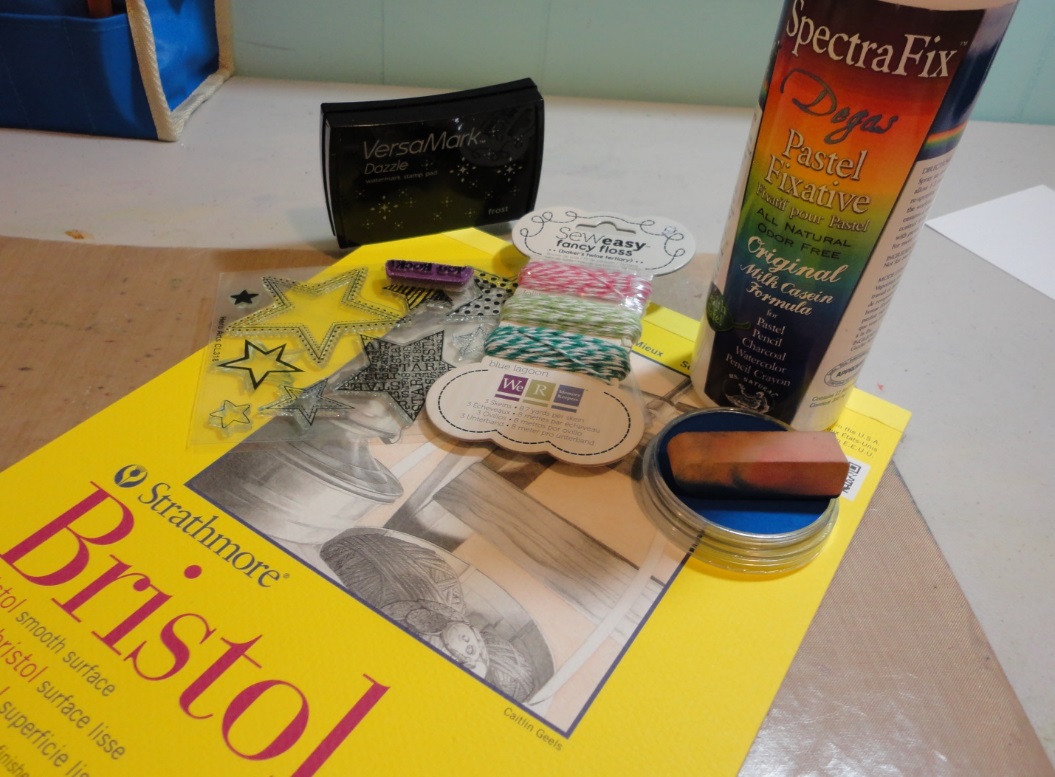
Katherine and I have conspired to put together an Emergency Art Kit for you, designed for portability and suitable for any child from age 6 to about 96. Our criteria were that the contents had to be supremely versatile, compact, relatively low-mess and convenient to use when in travel; I often grab a large ziplock of supplies when we head out on a road trip or to the cabin and Katherine and I both use them.

Without further ado, here’s what Katherine thinks every good  Artist’s Kit ought to have for the artist and child in each of us (with my own refinements):

1. Paper. Specifically watercolour and sketching paper. Paper that is heavy enough to withstand glue and water. Paper you can stick things to and scribble on with impunity.

My sketch book, comprised of a combination Strathmore 400 Series Drawing Paper and Arches Cold-Press 300lb watercolour paper

While we often have a small tablet of watercolour paper with us, just as a convenient means of having the paper around, my choice method of making sure I have the right paper is to construct a book, like the one I made above, with removable pages, that contains a customized assortment of the different paper types that you like to use. Make it small enough to be portable and large enough to be a flat surface. You’ll always have the right paper with you, you can take out the sheets if they turn out to be good finished products, AND you can have a whale of a time making the book in the first place!

2. Glue. Practicality dictates a glue-stick, but my personal low-cost preference is for Elmer’s School Glue Gel. It’s blue, but dries clear. It can stick things, but also functions as a resist and a crackling medium in a pinch. If money is less of an object, go straight to the good stuff and buy yourself some Jones Tones Plexi Glue. That is the bee’s knees of PVA and can be used to create an embossed effect, with a little acrylic paint (as you can see in a post here)

3. Watercolour set & brushes. Do yourself a favour. Buy a good set of Cotman paints by Winsor & Newton. I still have and use the set I was given when I was twelve, as well as the set that my grandmother bought in art school in the 1930s. You can see them here:

Grandma’s paint set on left, mine on right.

Watercolours dry fast. They are versatile and compact. While I enjoy acrylics, transporting the results can be problematic, especially while camping.

Also make sure you have sleeves for the brush tips.

4. Watercolour pencils. These can be used as straight colouring pencils or wet and blended for use as a paint. Very handy.

5. Scissors. Just because sometimes things need cutting. I tote along my Leatherman tool (every mother should have one) and there are compact scissors therein.

Glue, pencils, erasers, Micron pigma pens and a newer incarnation of the afore-mentioned watercolour set.

6. Drawing pencils. A small set is fine. Go for graphite instead of charcoal and fixative doesn’t have to be added to your retinue.

7. Eraser. I’m still a fan of the gum eraser.

8. Bottle for water. Since you have watercolour paper, pencils and paint… Don’t use a drinking cup. Watercolour pigments are toxic.

9. Pencil sharpener. Blindingly obvious when you don’t have one and one is required. Pocket knives do not sharpen watercolour pencils well.

10. Pigma Micron pens, in a couple of diameters. These are light-fast and, once dry, waterproof. They’re excellent for sketching, adding text or simply jotting down notes on the fly.

And there you have it. Enough basics to keep creativity and soul together on the fly all compiled into a large ziplock bag.  Throw in a few paper towels and you’re good to go!

Vicky

Share this:

  • Click to share on Twitter (Opens in new window)
  • Click to share on Facebook (Opens in new window)
  • Click to email a link to a friend (Opens in new window)
  • Click to share on Pinterest (Opens in new window)
  • Click to share on LinkedIn (Opens in new window)
  • Click to print (Opens in new window)
  • Click to share on Tumblr (Opens in new window)
  • Click to share on Reddit (Opens in new window)
  • Click to share on Pocket (Opens in new window)

Like this:

Like Loading...

Gelli Plate Printing |Guest Post: Karen

26 Tuesday Nov 2013

Posted by Sara in Guest Post, Mixed Media, ScrapBook, Tutorials

≈ 4 Comments

Tags

GelliPlate, Guest Post, Mixed media, Scrapbook Layout

I’m on vacation for a few days to visit my brother and his lovely (and pregnant!) wife. While I’m away some of my favourite local artists and bloggers have agreed to do posts for you! Today, Karen shares her newfound love of the Gelli Arts Gel Printing Plate. Enjoy!


I was honoured when Sara asked me to guest post for her blog while she is vacationing. Hope you are having a great time Sara!

Last week, I bought a Gelli Arts Gel Printing Plate and I have been having a blast learning and experimenting with different kinds of prints. I have created lots of fun backgrounds for art journal pages, but I was even more delighted when I realized the great backgrounds I could make for my scrapbook pages!

Today I am sharing my very first gel print scrapbook layout. Hooray!

For my print I used two colours of Silks Acrylic Glaze- Watermelon Mist and Carmen.

First I did a very simple layer of Watermelon Mist (pink). I just spread the glaze on the plate, put the paper on and pulled it off.

1

For my second layer, I spread on some Carmen (red). I pressed down a stencil and while the stencil was on the plate I used a roller dots stamp over the plate for extra texture.

2

Then I lifted the stencil before applying the paper.

3

Here’s what it looks like after the pull! Love it!

4

What a great base for a page right?! Next I chose some paper from the Simple Stories I {Heart} Summer line, which I just love, by the way. And once I added a few embellishments it was done.

5

So it’s official – I am in love with the Gelli Plate! How about you?!

Karen

You can check out more of my stuff on my blog at http://sitscrapandrelax.wordpress.com

Related articles
  • Create Daily: Gelli Arts Monoprinting (rondapalazzari.typepad.com)
  • Brother ScanNCut: Gelli Prints (balzerdesigns.typepad.com)
  • Round prints on a rectangle Gelli Plate (scrappystickyinkymess.wordpress.com)

Share this:

  • Click to share on Twitter (Opens in new window)
  • Click to share on Facebook (Opens in new window)
  • Click to email a link to a friend (Opens in new window)
  • Click to share on Pinterest (Opens in new window)
  • Click to share on LinkedIn (Opens in new window)
  • Click to print (Opens in new window)
  • Click to share on Tumblr (Opens in new window)
  • Click to share on Reddit (Opens in new window)
  • Click to share on Pocket (Opens in new window)

Like this:

Like Loading...

Art Book | Guest Post: Marg

25 Monday Nov 2013

Posted by Sara in Guest Post, Mixed Media

≈ 6 Comments

Tags

Guest Post, Mixed media

I’m on vacation for a few days to visit my brother and his lovely (and pregnant!) wife. While I’m away some of my favourite local artists and bloggers have agreed to do posts for you! Today, Marg shares a fun Art Book she taught to a group of young girls. Enjoy!                                                                            

Thanks, Sara for asking me to be a guest blogger.

On November 11, four wonderful nine-year-old girls came over to my house and we had so much fun making an Art Book.

This is my Art Book:

1

Here is the inside of my book:

2

In making these books we used Watercolour Paper, Golden Reg Matte Medium, Claudine Hellmuth Sticky Back Canvas, Stencils, Tissue paper,Tattered Angels Chalkboard Mist, Maya Road Chipboard pieces, Studio Calico Mistables, Basic Liquitex acrylic paints, Dylusion Stamps, Inka Gold, Permaopaque pens, Sizzix and Magazines.

I showed the girls my book and they proceeded to make their own. All were so different and they were all so wonderful! It was so nice watching their imaginations at work.

Here are two of the girl’s books:

Claire’s Book

3

Jordan’s Book

4

I love working with children because they get so excited and have so much imagination which they are not afraid to follow. We should be so lucky.

If you have young children make sure they have time to experiment with art. Sit back and enjoy their inhibitions when they are creating.

Take Care

Marg

Share this:

  • Click to share on Twitter (Opens in new window)
  • Click to share on Facebook (Opens in new window)
  • Click to email a link to a friend (Opens in new window)
  • Click to share on Pinterest (Opens in new window)
  • Click to share on LinkedIn (Opens in new window)
  • Click to print (Opens in new window)
  • Click to share on Tumblr (Opens in new window)
  • Click to share on Reddit (Opens in new window)
  • Click to share on Pocket (Opens in new window)

Like this:

Like Loading...

Pan Pastels | Guest Post: Tanya

22 Friday Nov 2013

Posted by Sara in Guest Post, Mixed Media, Tutorials

≈ 8 Comments

Tags

Guest Post, Mixed media, PanPastel

I’m on vacation for a few days to visit my brother and his lovely (and pregnant!) wife. While I’m away some of my favourite local artists and bloggers have agreed to do posts for you! Today, Tanya shares her love and amazing use of PanPastels. Enjoy!


I’m excited to guest blog for Sara and share my new favorite thing – pan pastels! I’ve been eyeing them for ages, but resisted buying until I took a class at The Paperie by Cathie Reed. After that, I had no choice but to buy them, I was hooked. I love to make backgrounds for projects with pan pastels.

You can read more about pan pastels here.

The first project is so simple and fast to make and you just need one pan pastel – that’s right – just one, so if you are interested in experimenting with them, you don’t need to spend a lot to try it out.

1

Gather your supplies. Here is a list of what I used:

  • Ultramarine blue pan pastel and sofft sponge
  • Spectra fix
  • Bristol paper (You can use whatever you have on hand, this was the closest for me to grab)
  • Stamps
  • Versa mark
  • tape
  • Some embellishments (of course!)

Cut your paper to the size of the card you want to make. Gently swipe the sponge over the pan pastel two to three times and color in the paper with swiping motions, like using a paint brush. If you have loose pastel powder on the surface of the pan pastel, then you are using too much pressure when swiping up the color.

2

Once you have it all colored in and at the shade you like, ink up your stamp with versa mark and stamp. It won’t be very visible. Add some more pan pastel. Ta da – the magic happens!

3

You then have to spray it with a fixative so it will set. I like the spray spectra fix, safe and no odor. It takes about 1-2 minutes for it to evaporate and dry.

Add your sentiment stamp, embellishments and adhere it to a card base. Easy peasy, you are done.

4

This technique would work fabulously on a 12x 12 layout or canvas.

The next background I want to show you is on a canvas. For this project I used:

  • Canvas
  • Tissue paper
  • Cheese cloth
  • Matte multi-medium
  • Various papers ( I used cut up gift wrap that looked like tickets)
  • Gesso
  • Pan pastels and sofft sponges
  • Fixative spray

5

I crumpled up some plain white tissue paper and adhered it on the canvas with the multi medium. I did the same with the cheese cloth and paper. Remember to put the multi medium under and over what you are putting on the canvas.

6

Once that was dry, I put a thin coat of gesso over the whole canvas with a paint brush. The gesso helps the pan pastels go on so smooth and tones down your paper colors a little.

7

That layer dries much more quickly than the multi medium. Now you are ready to add the color goodness of pan pastels.

8

I used ultramarine blue shade all over the canvas the same way I did the paper for the card.

I love how the texture of the tissue paper:

9

and cheese cloth:

10

picks up the color.

I then sprayed with the fixative and once it was dry, I added more color. This time I used phthalo blue to shade and paynes grey for the edges. Of course, I sprayed with the fixative again.

11

Now you have a great background complete. I will admit, I did have a lot of backgrounds done on canvas, but I used them all up at the retreat. It seems so much faster to work on a canvas without having to do the background prep.

This is what I did with this background:

12

That’s all folks, and thanks for letting me share my new love, Sara!

Tanya

Related articles
  • so many ways to be inspired… (donnadowney.typepad.com)
  • Pan Pastels (itsacreativeworld.typepad.com)
  • The Grass is Greener Where You Water It or…PanPastel Metallics (nathaliesstudio.com)

Share this:

  • Click to share on Twitter (Opens in new window)
  • Click to share on Facebook (Opens in new window)
  • Click to email a link to a friend (Opens in new window)
  • Click to share on Pinterest (Opens in new window)
  • Click to share on LinkedIn (Opens in new window)
  • Click to print (Opens in new window)
  • Click to share on Tumblr (Opens in new window)
  • Click to share on Reddit (Opens in new window)
  • Click to share on Pocket (Opens in new window)

Like this:

Like Loading...

This is me!

  • Sara

RSS Feed RSS - Posts

Enter your email address to follow this blog and receive notifications of new posts by email.

Join 996 other subscribers
Simple Scrapper Design Team

Simple Scrapper Creative Team

  • Alexa Gill
  • Allie Trumpower
  • Amy Melniczenko – Team Leader
  • Ann Tamimi
  • Arielle Gordon
  • Cathy Caines
  • Christy Strickler
  • Crystal Livesay
  • Delanie Wood
  • Jamie Leija
  • Jan Sowder
  • Jen Conlon – Social Media Manager
  • Jennifer Johnson
  • Jennifer Wilson – Owner/Editor
  • Jenny Larson
  • Kathryn Quintana
  • Kelly Sroka
  • Kimberly Kalil
  • Lisa Corbin-Polak
  • Lisa Hausman
  • Melanie Ritchie – Graphic Designer
  • Neisha Sykes – Graphic Designer
  • Nicole LeBlanc
  • Sandy Henderson
Scrapbook Steals Design Team

Flickr Photos

i ami am wordsfunny things title
More Photos

Twitter Updates

  • @berncoad @VOCMNEWS @PeterCBC @NTVNewsNL @KellyAnneNTV @CMOH_NL Drives me crazy!The moderator should put a stop to it. 2 years ago
  • #mistergabe repping the rainbow all around today and stealing my @target #targetpride hoodie. #pride🌈❤️🧡💛💚💙💜 @ Moun… twitter.com/i/web/status/1… 3 years ago
  • Flowers from Evan. 😍 #awesomeevan #sarathings robertpmendoza @ Mount Pearl, Newfoundland and Labrador instagram.com/p/BzF9AVDh37d/… 3 years ago
Follow @saracees
Follow Me on Pinterest pinterest-5ef5b.html

Categories

Ronda Palazzari Designs
Balzer Designs

Blogroll

  • Artist Wanna Be
  • Confessions of a Twenty Something Artist
  • Darrell Strickland
  • day jobs and the night life..
  • driven to ink
  • For The Love Of Art
  • Gone to the Dogs
  • Graham Case
  • Graham Case Photography
  • It's About Time…
  • pieces of my everyday life…
  • Sit, Scrap, and Relax
  • The Paperie
  • with Coffee in Hand
  • {Every Day}
Art Class Workshop
Balzer Designs Stencil 101
UberMedia Canvas Class
UberMedia Gesso

Archives

  • April 2016
  • February 2016
  • December 2015
  • November 2015
  • October 2015
  • July 2015
  • June 2015
  • May 2015
  • April 2015
  • March 2015
  • February 2015
  • January 2015
  • December 2014
  • November 2014
  • October 2014
  • September 2014
  • August 2014
  • July 2014
  • June 2014
  • May 2014
  • April 2014
  • March 2014
  • February 2014
  • January 2014
  • December 2013
  • November 2013
  • October 2013
  • September 2013
  • August 2013
  • July 2013
  • June 2013
  • May 2013
  • April 2013
  • March 2013
  • February 2013
  • January 2013
  • December 2012
  • November 2012
  • October 2012
  • September 2012
  • August 2012
  • July 2012
  • June 2012
  • May 2012
  • April 2012
  • March 2012
  • February 2012
  • January 2012

Create a free website or blog at WordPress.com.

Privacy & Cookies: This site uses cookies. By continuing to use this website, you agree to their use.
To find out more, including how to control cookies, see here: Cookie Policy
  • Follow Following
    • sarathings
    • Join 316 other followers
    • Already have a WordPress.com account? Log in now.
    • sarathings
    • Customize
    • Follow Following
    • Sign up
    • Log in
    • Report this content
    • View site in Reader
    • Manage subscriptions
    • Collapse this bar
 

Loading Comments...
 

    %d bloggers like this: