• About

sarathings

~ my art, my family, my life, my stuff…

sarathings

Tag Archives: Luminarte

Paperie Card Kit – March 2014: Part 3 – Assemblage Clock

28 Friday Mar 2014

Posted by Sara in Card Kit, Mixed Media

≈ 2 Comments

Tags

Assemblage Clock, Luminarte, Silks, The Paperie Card Kit, Tim Holtz

So, it’s been a bit longer than anticipated but I’m finally back with the last piece I made for the March Paperie Card kit.

When Tim Holtz debuted his Assemblage Clock I fell in love and snatched it up. Then, it just sat there. A case of must have, don’t know what to do. Until this kit!

I admit I was totally inspired by the gold rubons – one of which was “I love you to the moon & back.” Molly and I say that to each other every night, it had to used!

I printed one of my favourite pics of Molly when she was a teeny tiny and added that to the inside of the clock after I had painted everything with Silks Acrylic Glaze:

assemblage clock outside

I punched some hearts out of patterned paper, painted them, added some more rubons:

assemblage clock inside

And then put it all back together again!

assemblage clock

I love how it turned out – holding onto that clock was well worth the wait!

S.

Share this:

  • Click to share on Twitter (Opens in new window)
  • Click to share on Facebook (Opens in new window)
  • Click to email a link to a friend (Opens in new window)
  • Click to share on Pinterest (Opens in new window)
  • Click to share on LinkedIn (Opens in new window)
  • Click to print (Opens in new window)
  • Click to share on Tumblr (Opens in new window)
  • Click to share on Reddit (Opens in new window)
  • Click to share on Pocket (Opens in new window)

Like this:

Like Loading...

I’d like to be….

04 Thursday Jul 2013

Posted by Sara in Mixed Media

≈ 2 Comments

Tags

Canvas, Luminarte, Mixed media

….under the sea.

One of my favourite projects from the April Paperie Retreat – actually, one of my favourite projects ever – was a canvas I did just as we were gearing down to go home. I had the base done, had demoed on it for previous canvas classes, and it needed to be finished.

I painted the base texture with Silks and Primary Elements with no idea of where I was heading. Once the colour was on all I could see was the ocean.

So I stole a bit of moss from Tina, an old compass transparency from Cathie, stuck on a bit of cheesecloth (a personal texture making fave!) and played around with Dyan Reaveley’s Ruby Rainbow set to make myself a mermaid in the sea.

Ruby has crazy hair in the stamp set so I cut it off, moved it all around, then painted it, and some cheesecloth, with Orange Peel Twinks. And made her hair even a bit more crazy than before!

under the sea - hair

Her tail is a shimmery bit of awesomeness made possible by Primary Elements mixed into Old Silver Inka Gold. I then etched the scales with a pencil. It’s hard to photograph but the colour starts pink and fades into purple – it’s just gorgeous:

under the sea - scales

I printed the words on some Martha Stewart Avery labels (love those kraft self-adhesive labels for quotes like this!) and stuck them down:

under the sea - words

I wish you could all see this in person because the shimmer and dimension and texture and subtle colour variation is fab! Yes, I’m patting my own back! 🙂

I hope you like her as much as I do, she sits on the wall over my computer where I can enjoy her everyday:

under the sea

I’m offline for a few days now; I have a very special wedding to attend this weekend (the card and hopefully some pics to come next week) and then fingers are crossed for a day at the cabin on the Sands. I also have ICAD’s to catch up on, some special guest blog posts to write, and an exciting scrapbook project to dive into. I’ll be back when I can come up for air!

S.

Share this:

  • Click to share on Twitter (Opens in new window)
  • Click to share on Facebook (Opens in new window)
  • Click to email a link to a friend (Opens in new window)
  • Click to share on Pinterest (Opens in new window)
  • Click to share on LinkedIn (Opens in new window)
  • Click to print (Opens in new window)
  • Click to share on Tumblr (Opens in new window)
  • Click to share on Reddit (Opens in new window)
  • Click to share on Pocket (Opens in new window)

Like this:

Like Loading...

I just love me some Primary Elements!

03 Wednesday Jul 2013

Posted by Sara in Mixed Media, ScrapBook, Techniques

≈ Leave a comment

Tags

Luminarte, Mixed Media Layout, Primary Elements

I’ve mentioned here, just once or twice before, how much I love Luminarte products – Silks, Twinkling H2O’s, Modeling Creme. And I have something else to add to that list: Primary Elements.

Primary Elements are artist quality paint pigment, with the expected Luminarte shimmer. There are so many different ways to use them and I demonstrated several at the last Paperie Retreat, but I’m only going to highlight two here.

I made this first LO to promote the demo at the retreat:

colorful life

I went fairly basic, just one colour of Primary Elements mixed into Clear Medium, then painted on the cardstock to make a photo mat. The Clear Medium is acrylic paint base, with a built-in binder so you don’t lose any of that fabulous shine! It’s completely colourless until you add your pigment. You can mix your own colours and intensity of colours, and how much or how little you want, totally customizable!

I then blended a bunch of colours together and mixed that into some light molding paste which I smeared over the 6×6 Heart Confetti stencil:

colorful life - molding paste

It made a great purply/silvery colour which looks awesome.

During the demo I showed how to mix the Primary Elements into the Clear Medium or Molding Paste, how to dilute or intensify the colour, and how to mix your own shades. These next two LO were the scratch papers I used and then decided to finish off.

The first one has a photo base of mixed colours:

fablious fairy

and then one colour for the paste:

fablious fairy - molding paste

This final LO was actually the first demo page I made, showing how vibrant the base colours can be on their own:

buddies

I love the texture of the molding paste on this one!

buddies - molding paste

There are tons of colours in the Primary Elements line and they can all be mixed to make hundreds of other colours. The Paperie carries both the pigments and the Clear Medium plus they can order any colours you might like so go check out the website and then get some and go play!

If you want to see and touch these LO’s in person, I’ll be bringing them to the Paperie to display so pop by to check out their brand new location at 10 Pippy Place and take a look.

S.

Share this:

  • Click to share on Twitter (Opens in new window)
  • Click to share on Facebook (Opens in new window)
  • Click to email a link to a friend (Opens in new window)
  • Click to share on Pinterest (Opens in new window)
  • Click to share on LinkedIn (Opens in new window)
  • Click to print (Opens in new window)
  • Click to share on Tumblr (Opens in new window)
  • Click to share on Reddit (Opens in new window)
  • Click to share on Pocket (Opens in new window)

Like this:

Like Loading...

ICAD 2013 | June 6: there is no doubt

07 Friday Jun 2013

Posted by Sara in ICAD

≈ 3 Comments

Tags

ICAD, Luminarte, The Crafter's Wrokshop

Earlier this week a friend found out that she lost the very much wanted and already very much loved little peanut she was carrying.

It’s been a difficult time.

So this one is for her and her family:

there is no doubt

There is no doubt the peanut was so loved and wanted.

There is no doubt they’re devastated right now.

And there is no doubt that their world has changed but will still be beautiful on the other side.

S.

Share this:

  • Click to share on Twitter (Opens in new window)
  • Click to share on Facebook (Opens in new window)
  • Click to email a link to a friend (Opens in new window)
  • Click to share on Pinterest (Opens in new window)
  • Click to share on LinkedIn (Opens in new window)
  • Click to print (Opens in new window)
  • Click to share on Tumblr (Opens in new window)
  • Click to share on Reddit (Opens in new window)
  • Click to share on Pocket (Opens in new window)

Like this:

Like Loading...

ICAD 2013 | June 4: meow

05 Wednesday Jun 2013

Posted by Sara in ICAD

≈ 6 Comments

Tags

ICAD, Luminarte, Stencils, The Crafter's Workshop, Twinkling H2O's

My brother was here from BC for a month and his girlfriend joined him this past week. But today they left to go home again. 😦

And for those of you who don’t know Canadian geography that well, Mount Pearl and Vancouver are about as far apart as you can possibly get. They’re waaaaaay over there on the west coast. Boo.

So, in honour of “Uncle Grayma,” I made this ICAD:

meow

Confused? Well, if I ever find it I’ll post a link to a YouTube video of Graham, serenading a friend of his with a composition of his own. I’m assuming it’s his own, I don’t think anyone else in the world would claim it.

He simply plays his guitar and sings, “Meow, meow, meow,” over and over. Hilariously funny to me, maybe not so funny to you all but I’m going to make you suffer through anyway. As soon as I find the link….

I used some new Twinks on this one because 1. they’re new, 2. they’re shimmery, and 3. green in Graham’s favourite colour. It actually runs in the family – Matthew (my other brother), Gabe, and I all claim green as ours as well. It must be genetic!

meow - cat

And since I can’t seem to do anything without some dimension, I added light molding paste through one of my fave stencils (thanks again, Julie! You make the best designs!)

meow - paste and shine

Back tomorrow with another one!

S.

Are you doing this challenge? Are you posting your ICAD’s anywhere? Leave me a link in the comments so I can check them out!

Share this:

  • Click to share on Twitter (Opens in new window)
  • Click to share on Facebook (Opens in new window)
  • Click to email a link to a friend (Opens in new window)
  • Click to share on Pinterest (Opens in new window)
  • Click to share on LinkedIn (Opens in new window)
  • Click to print (Opens in new window)
  • Click to share on Tumblr (Opens in new window)
  • Click to share on Reddit (Opens in new window)
  • Click to share on Pocket (Opens in new window)

Like this:

Like Loading...

She’s a Crazy Angel…

12 Friday Apr 2013

Posted by Sara in Art Journal, Mixed Media

≈ 8 Comments

Tags

Art Journal, Dyan Reaveley, Julie Fei-Fan Balzer, Luminarte, Splash of Color, The Crafter's Workshop

This is the latest Art Journal page I’ve been working on – lots of shimmer as I continue my obsession love affair with Luminarte products.

angel

For my angel’s background I painted several colours of Silks and slightly blended them. I wasn’t sure where I was going with it but now it looks like an ocean to me – and I love her floating in it! I have to go back and do some more blending of the colours, make the transitions more seamless between the colours.

Once that dried, I pressed InkaGold and Perfect Medium through some stencils, pressed down the negatives, then dusted Perfect Pearls powder over the medium. My love of shimmer crosses manufacturer lines, I don’t mind cheating a little!

angel - shimmer

Finally,I stamped one of the Dyan Reaveley girls on vintage book pages and fussy cut it all out, along with some wings. She got painted in with more Silks, though I used Twinkling H2O’s for her crazy hair – love her eyes and blue they turned out! And I really love the gold shimmer in the orange Twinks!

angel - closeup

Lots more left to do with this page, but I’m loving it’s beginning!

What have you been working on lately? Any fun shimmery things? 🙂

S.

Share this:

  • Click to share on Twitter (Opens in new window)
  • Click to share on Facebook (Opens in new window)
  • Click to email a link to a friend (Opens in new window)
  • Click to share on Pinterest (Opens in new window)
  • Click to share on LinkedIn (Opens in new window)
  • Click to print (Opens in new window)
  • Click to share on Tumblr (Opens in new window)
  • Click to share on Reddit (Opens in new window)
  • Click to share on Pocket (Opens in new window)

Like this:

Like Loading...

YLA2013 | Album Cover

19 Tuesday Mar 2013

Posted by Sara in Classes, Mixed Media, Techniques, Yearlong Album

≈ 10 Comments

Tags

Album cover, Luminarte, Mixed media, Ronda Palazzari, Silks, Stencil, The Crafter's Workshop, Yearlong Album, YLA2013

This may be one of my favourite projects ever. The colours, the texture, the dimension, the shine and, hello! That stencil.

album covers

Seriously people, that stencil may be my favourite of all time, maybe even edging out the Pomegranate one. Yes, it’s that good. It’s so good that I could even say I’m in love with Ronda Palazzari  for designing it and Jamie at The Crafter’s Workshop for making it. I love it so much that I made sure everyone in my Yearlong class got the 12×12 one as well.

Moving along, this lovely project also happens to be the album cover we are making for the Yearlong 2013 class. Obviously, as it is a mixed media album no one will have the exact same cover but I’ll be teaching all the techniques I used and showing how I got that awesome texture (hint: teabags may have been involved!).

album cover - tea bag texture

I also used modeling paste which made the hearts pop:

album cover - large heart album covers - small hearts

And gave fabulous dimension to the spine:

album cover - spine closeup

The paints I used were Luminarte Silks to give it that awesome shimmer and shine:

album cover - cheesecloth texture

And for those who don’t have Silks yet (I stress the word yet, they are a necessity!) I’m working on a way to use your regular acrylics and make them into a faux shimmer glaze. If it works, I’ll do a tutorial some Tuesday soon.

If you can’t already see the reason I love the Confetti stencil, here’s why:

album cover - shine

It’s like paint spatters, and blobs of molding paste, and quirky hearts all thrown together with great, but still imperfect, border to tie it all together.

And here’s a closeup of the front so you can really see how it all came together:

album cover - front

The back is very similar, but the paints blended a little differently. Plus, I still think I’m going to add a small camera stamp and my signature:

album cover - back

I had truly planned to do an album title and some decoration but I couldn’t bear to cover this up so… I guess we’ll have to go with Happy as an album title! 🙂

I’ll be back next week with the LO for this month, so look out for that later and keep an eye on Instagram (#YLA2013) for sneaks of it!

S.

Share this:

  • Click to share on Twitter (Opens in new window)
  • Click to share on Facebook (Opens in new window)
  • Click to email a link to a friend (Opens in new window)
  • Click to share on Pinterest (Opens in new window)
  • Click to share on LinkedIn (Opens in new window)
  • Click to print (Opens in new window)
  • Click to share on Tumblr (Opens in new window)
  • Click to share on Reddit (Opens in new window)
  • Click to share on Pocket (Opens in new window)

Like this:

Like Loading...

Mixed Media Guest Post!

21 Wednesday Nov 2012

Posted by Sara in Mixed Media

≈ 5 Comments

Tags

canvas, Luminarte, Mixed media, Silks, The Crafter's Workshop

I’m guest posting over at Krista’s blog today – go check out how I made this beauty!

Happy Memories

S.

Share this:

  • Click to share on Twitter (Opens in new window)
  • Click to share on Facebook (Opens in new window)
  • Click to email a link to a friend (Opens in new window)
  • Click to share on Pinterest (Opens in new window)
  • Click to share on LinkedIn (Opens in new window)
  • Click to print (Opens in new window)
  • Click to share on Tumblr (Opens in new window)
  • Click to share on Reddit (Opens in new window)
  • Click to share on Pocket (Opens in new window)

Like this:

Like Loading...

Tuesday Techniques and Tutorials – Twinkling H2O’s

30 Tuesday Oct 2012

Posted by Sara in Techniques, Tuesday Techniques, Tuesday Tutorials

≈ 2 Comments

Tags

Creative Imaginations, Kraft Glassine, Luminarte, Ranger, Twinkling H2O's

I have a mad love and passion for Twinkling H2O’s.

I admit it – they’re just one of the most beautiful products out there and add so much to a project.

So I had fun today and decided to try them out on a couple of different surfaces using a resist technique. My plan was to see if I could come up with some Christmas Card ideas and I think I have!

All you need (I forgot to take a pic of supplies!) are Twinkling H2O’s, a paintbrush, water, a mister of water, embossing powder and a heat tool, and any surfaces you want to paint on – I used vellum, watercolour paper, and kraft glassine.

First, mist your Twinks with water. These are solid paints and they need to sit a bit to get , well, painty! For this technique I made them really liquidy, like watercolours.

Mist your Twinks…

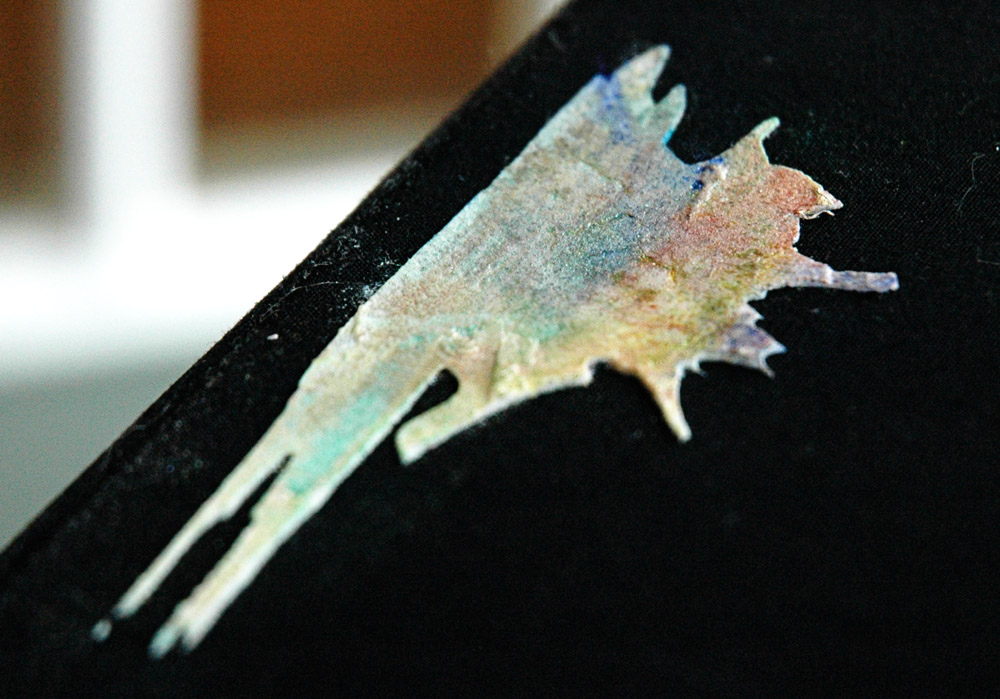
Next, stamp your image with Versamark ink and heat emboss. I did kraft glassine first:

kraft glassine embossed

As you can see, due to the nature of the coating on the glassine, the image isn’t as crisp as it would have been on paper.

Now, swipe colour over your embossed image, the coating on the glassine will cause the paint to pool a lot on the surface:

painted…

At this point, I pressed my cloth onto the surface and picked up most of the liquid, and so, the colour:

As you can see, it’s very faint but the shimmer sat right on top of the glassine and looked awesome!

glassine shimmer

I tried watercolour paper next, and because of the surface, it took the colour really well but left less shimmer – definitely the easiest surface to work with but not as much final impact:

watercolour paper

It’s still pretty though!

Finally, I tried out vellum. This was the hardest surface, it curled a lot with the water, and the colour didn’t sink in so ran a lot because of the curling, but it had the best combination of colour and shimmer together:

vellum

Also, the translucency of the vellum made a great effect too.

Once  I had tried them all out, I went back to the vellum and held it down so it wouldn’t curl and the colour wouldn’t run as much. Then I heat set the paint until the surface was dry. I like how it turned out but it’s way too much fussy work for quick cards:

I also used silver embossing here, instead of the white I used on all the other pieces – love the extra shine it gives!

I went back to the glassine and thought that the colour might take to the glassine better if I crumpled up the paper and broke the coating, which I did, and then added another layer of paint. It turned out pretty well!

And this turned out to be my favourite card – I love the soft colours.

My favourite effect though, happened when I embossed the stamp on glassine, then crumpled it all up and painted on the broken surface – the darker paint colours stayed vibrant with a ton of shimmer!

And see the flecks of white on both glassine surfaces (you can see it best on the first card)? That’s the embossing powder. When I crumpled the paper it broke the hardened powder and when I painted, the brush and water caused flecks to flake off and stick in the paint colour. I think it looks cool – love that side effect!

I’ll definitely make some more glassine cards – it’s too much fun not to and it’s the perfect thing to do at the Retreat when it’s 3am and my mind no longer functions properly!

Hope you liked the cards, and I really hope you go buy some Twinks to play with – they really are the bomb!

S.


Share this:

  • Click to share on Twitter (Opens in new window)
  • Click to share on Facebook (Opens in new window)
  • Click to email a link to a friend (Opens in new window)
  • Click to share on Pinterest (Opens in new window)
  • Click to share on LinkedIn (Opens in new window)
  • Click to print (Opens in new window)
  • Click to share on Tumblr (Opens in new window)
  • Click to share on Reddit (Opens in new window)
  • Click to share on Pocket (Opens in new window)

Like this:

Like Loading...

Index Card A Day – #23

25 Monday Jun 2012

Posted by Sara in ICAD2

≈ Leave a comment

Tags

Archival Ink, Creative Imaginations, Golden, ICAD, ICAD2, Liquitex, Luminarte, Ranger, Stamper's Anonymous, Tim Holtz, Twinkling H2O's

I don’t know if I’m going to be able to tell you about this one – it was a big hot mess and so I just kept layering!

Essentially, there’s a ton of paper towel on here, and a bit of book paper. Then some Coarse Texture Gel over a stencil and heated, which added to the hot mess, so Flexible Molding Paste and another stencil.

Add some Twinkling H2O’s, some Stardust pen, and a quote… I’m calling it done!

Because of the multitude of paper towel layers and the molding paste, there’s lots of dimension and texture to this one:

See you soon for the last one!

S.

Share this:

  • Click to share on Twitter (Opens in new window)
  • Click to share on Facebook (Opens in new window)
  • Click to email a link to a friend (Opens in new window)
  • Click to share on Pinterest (Opens in new window)
  • Click to share on LinkedIn (Opens in new window)
  • Click to print (Opens in new window)
  • Click to share on Tumblr (Opens in new window)
  • Click to share on Reddit (Opens in new window)
  • Click to share on Pocket (Opens in new window)

Like this:

Like Loading...

This is me!

  • Sara

RSS Feed RSS - Posts

Enter your email address to follow this blog and receive notifications of new posts by email.

Join 995 other subscribers
Simple Scrapper Design Team

Simple Scrapper Creative Team

  • Alexa Gill
  • Allie Trumpower
  • Amy Melniczenko – Team Leader
  • Ann Tamimi
  • Arielle Gordon
  • Cathy Caines
  • Christy Strickler
  • Crystal Livesay
  • Delanie Wood
  • Jamie Leija
  • Jan Sowder
  • Jen Conlon – Social Media Manager
  • Jennifer Johnson
  • Jennifer Wilson – Owner/Editor
  • Jenny Larson
  • Kathryn Quintana
  • Kelly Sroka
  • Kimberly Kalil
  • Lisa Corbin-Polak
  • Lisa Hausman
  • Melanie Ritchie – Graphic Designer
  • Neisha Sykes – Graphic Designer
  • Nicole LeBlanc
  • Sandy Henderson
Scrapbook Steals Design Team

Flickr Photos

i ami am wordsfunny things title
More Photos

Twitter Updates

Tweets by saracees
Follow Me on Pinterest pinterest-5ef5b.html

Categories

Ronda Palazzari Designs
Balzer Designs

Blogroll

  • Artist Wanna Be
  • Confessions of a Twenty Something Artist
  • Darrell Strickland
  • day jobs and the night life..
  • driven to ink
  • For The Love Of Art
  • Gone to the Dogs
  • Graham Case
  • Graham Case Photography
  • It's About Time…
  • pieces of my everyday life…
  • Sit, Scrap, and Relax
  • The Paperie
  • with Coffee in Hand
  • {Every Day}
Art Class Workshop
Balzer Designs Stencil 101
UberMedia Canvas Class
UberMedia Gesso

Archives

  • April 2016
  • February 2016
  • December 2015
  • November 2015
  • October 2015
  • July 2015
  • June 2015
  • May 2015
  • April 2015
  • March 2015
  • February 2015
  • January 2015
  • December 2014
  • November 2014
  • October 2014
  • September 2014
  • August 2014
  • July 2014
  • June 2014
  • May 2014
  • April 2014
  • March 2014
  • February 2014
  • January 2014
  • December 2013
  • November 2013
  • October 2013
  • September 2013
  • August 2013
  • July 2013
  • June 2013
  • May 2013
  • April 2013
  • March 2013
  • February 2013
  • January 2013
  • December 2012
  • November 2012
  • October 2012
  • September 2012
  • August 2012
  • July 2012
  • June 2012
  • May 2012
  • April 2012
  • March 2012
  • February 2012
  • January 2012

Blog at WordPress.com.

Privacy & Cookies: This site uses cookies. By continuing to use this website, you agree to their use.
To find out more, including how to control cookies, see here: Cookie Policy
  • Follow Following
    • sarathings
    • Join 315 other followers
    • Already have a WordPress.com account? Log in now.
    • sarathings
    • Customize
    • Follow Following
    • Sign up
    • Log in
    • Report this content
    • View site in Reader
    • Manage subscriptions
    • Collapse this bar
 

Loading Comments...
 

    %d bloggers like this: